Connect IoT Data
Apache StreamPipes Connect is the entry point for bringing industrial and IoT data into the platform. It lets users create adapters from the web interface, inspect incoming events, refine schemas, and publish the resulting data streams for reuse across pipelines, dashboards, charts, and datasets.
This page explains the capabilities of StreamPipes Connect and the general workflow for connecting data. It intentionally does not cover protocol-specific configuration details. Those can be found in the How-to sections.
What StreamPipes Connect does
StreamPipes Connect turns external machine and software interfaces into structured StreamPipes data streams. Instead of building custom ingestion services for every source, users can configure adapters directly in the UI and publish the result into the platform.
Select the right adapter
Choose an integration that matches the source type instead of building custom ingestion logic from scratch.
Validate live input
Check that the source is reachable and inspect sample events before committing to a final stream.
Define transformations and metadata
Shape raw payloads into a cleaner StreamPipes event model with field metadata and optional pre-processing scripts.
Create an operated platform resource
Turn the connection into a reusable source that can be started, edited, persisted, linked, and governed over time.
Connect Overview

Key features
The current Connect experience provides a broader feature set than simply "configure source, then start adapter". The most important capabilities are easiest to understand through typical usage scenarios:
Adapter catalog
Start from a matching source type instead of building a custom ingestion service.
Example: A team wants to connect a new machine simulator, file-based source, or broker feed and starts by selecting the closest matching adapter.
Guided four-step configuration
Keep onboarding repeatable and understandable for non-developers.
Example: A process engineer moves from connection settings to schema validation without switching tools or writing code.
Live sample preview
Confirm that the source is really sending the fields and timestamp shape you expect.
Example: Before creating an adapter, a user checks whether the payload contains temperature, pressure, and a usable time field.
Schema refresh
Adjust when source-side fields change instead of recreating the adapter from scratch.
Example: After a source update adds a new field, the user refreshes the schema and continues refining it.
Field refinement
Turn technically valid fields into stream definitions that are understandable downstream.
Example: Mark machine_id as a dimension, temperature as a measurement, and add a unit before the stream appears in charts or pipelines.
Transformation logic
Clean up or normalize raw events before they become part of the platform model.
Example: Parse a source timestamp, rename fields, or derive a cleaner output event from a noisy message payload.
Templates
Reuse recurring configuration and preprocessing patterns across similar sources.
Example: A team stores a shared broker setup as a configuration template and reuses one timestamp-parsing script as a transformation template.
Persistence and asset linking
Decide whether the source should become historical data and whether it belongs to a specific machine context.
Example: Persist raw machine events for later analysis and link the adapter to a specific filling machine asset.
Lifecycle management and code export
Operate adapters over time and turn validated UI setups into repeatable automation.
Example: A team edits a running adapter after a schema change and exports the working definition for another environment.
How connecting data works
Connecting data in StreamPipes follows a consistent workflow, independent of the underlying protocol or source type.
1. Select an adapter
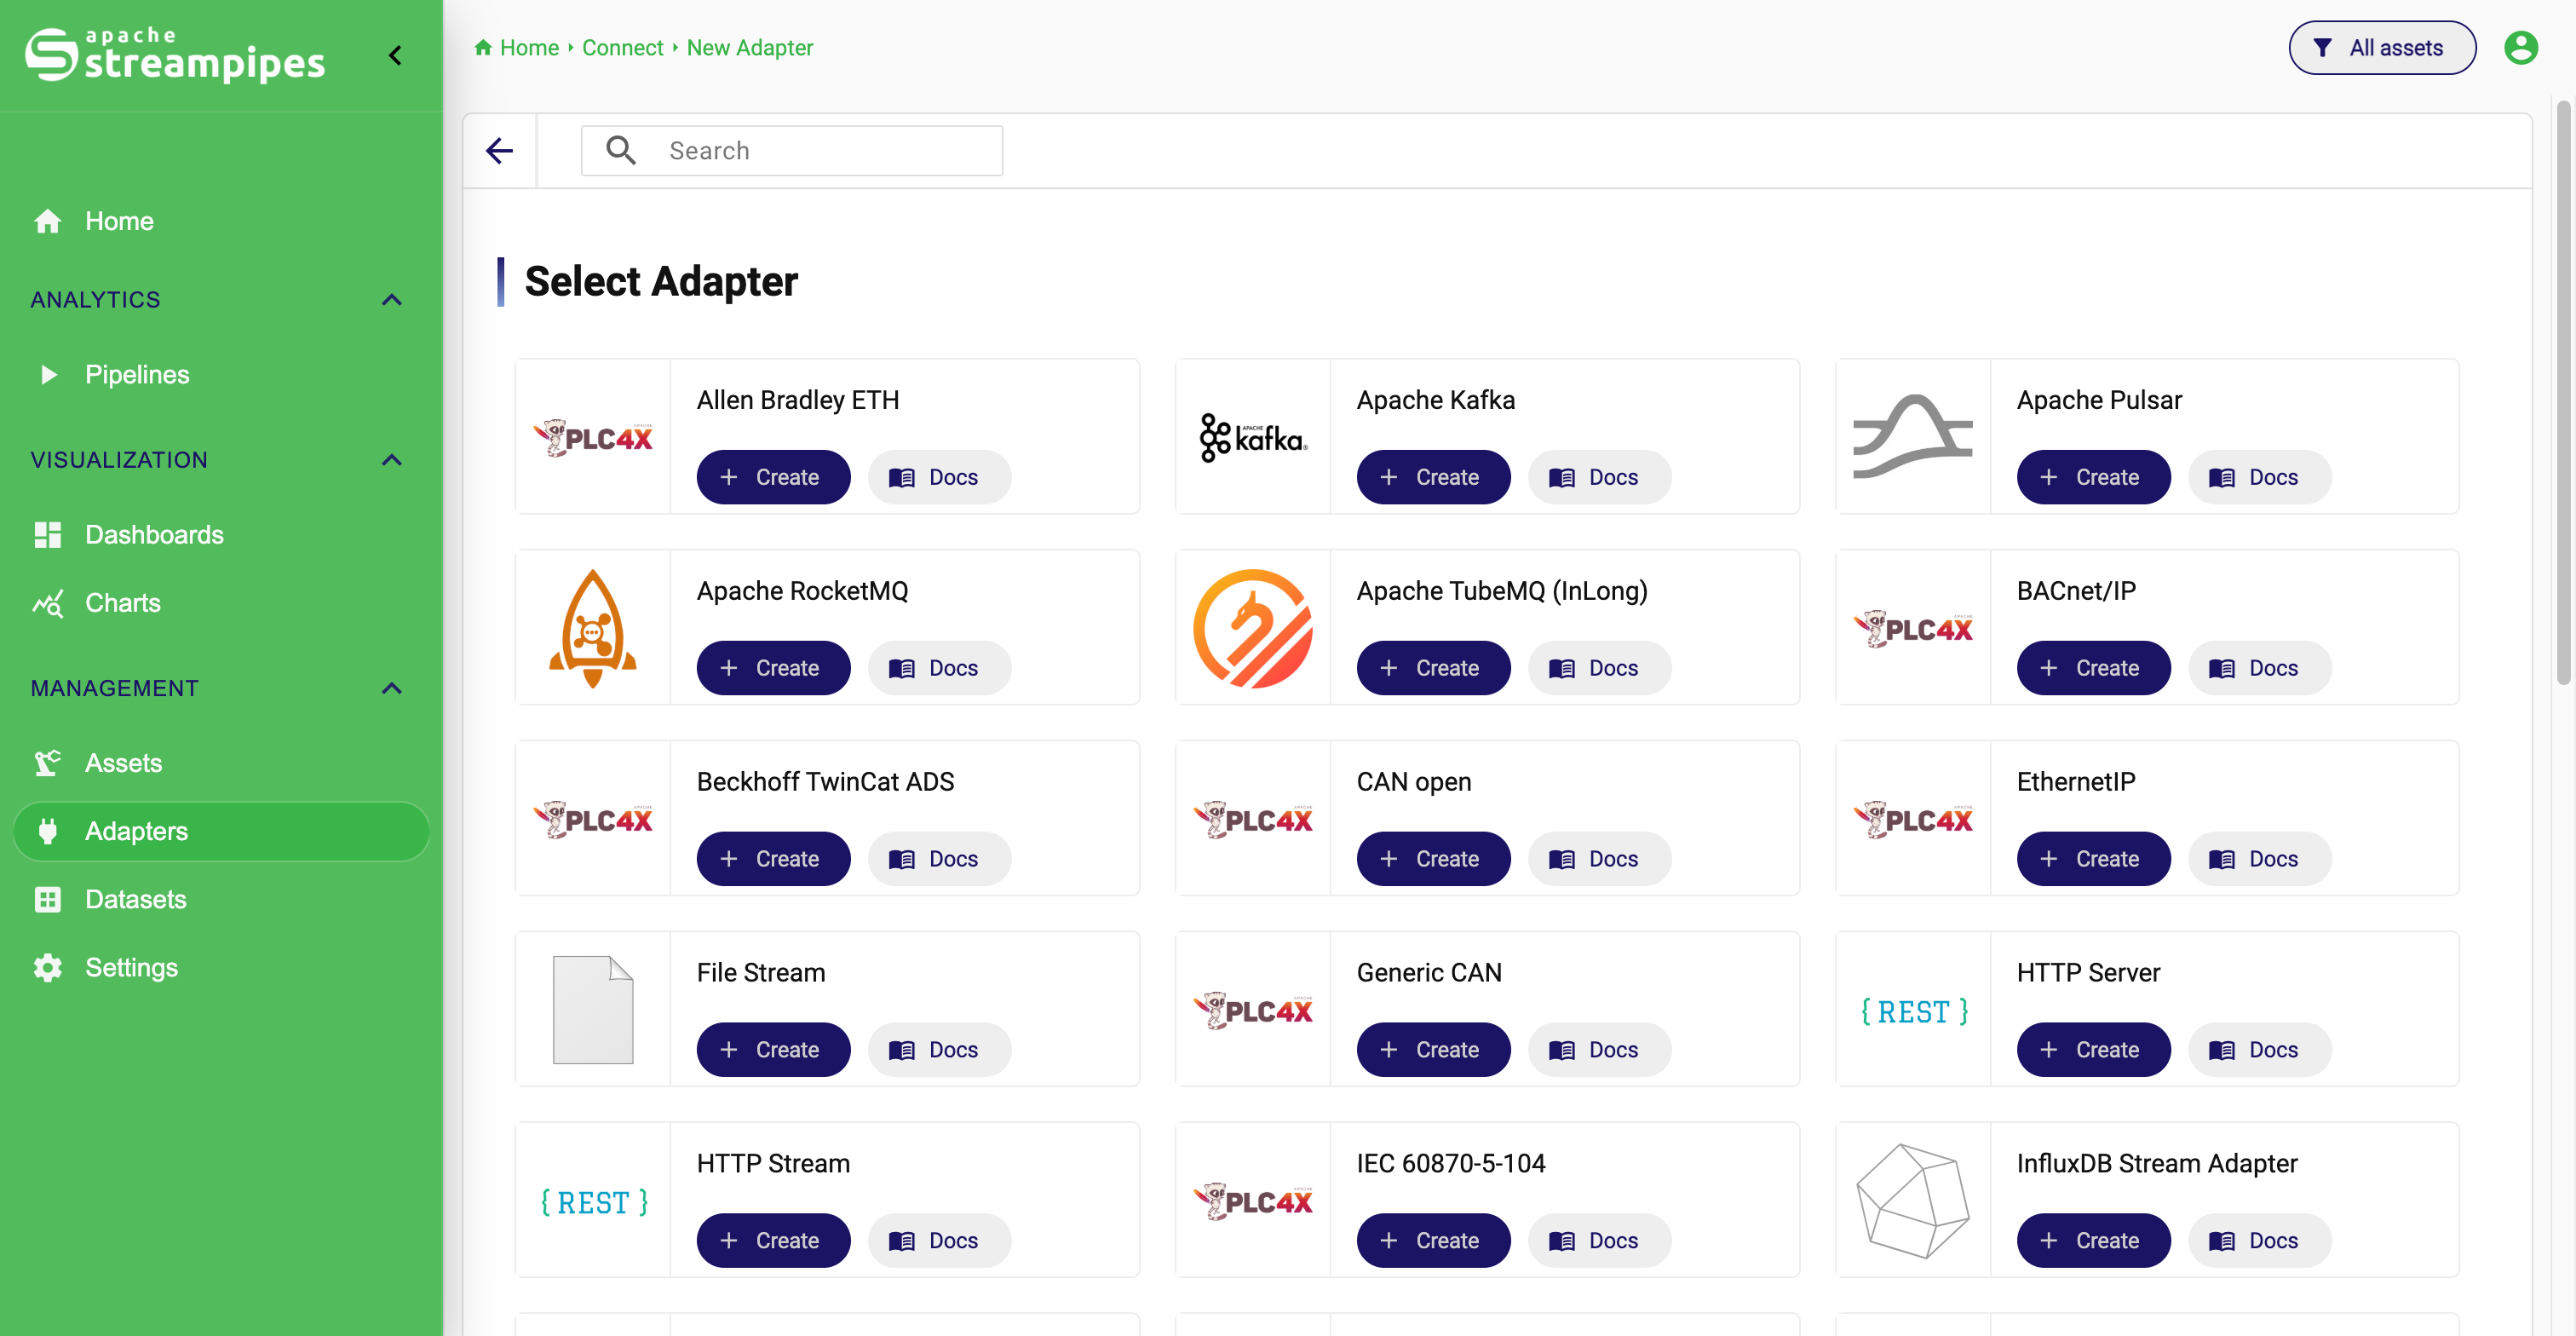
The process starts in the adapter catalog. This view lists the adapters that are currently available in the installation and lets users filter for the right source type.
An adapter represents the integration logic for a certain class of source system. Some adapters target common transport layers or message-based interfaces, while others target more specific machine or device integrations.
The goal of this step is simple: choose the adapter that best matches the source you want to connect.
A typical first decision
A team wants to onboard one new machine feed. They do not start by thinking about downstream pipelines yet. They start by choosing the adapter that best matches the source they already have, because that determines the configuration options and the sample data StreamPipes can inspect next.
Select an Adapter
2. Configure source settings
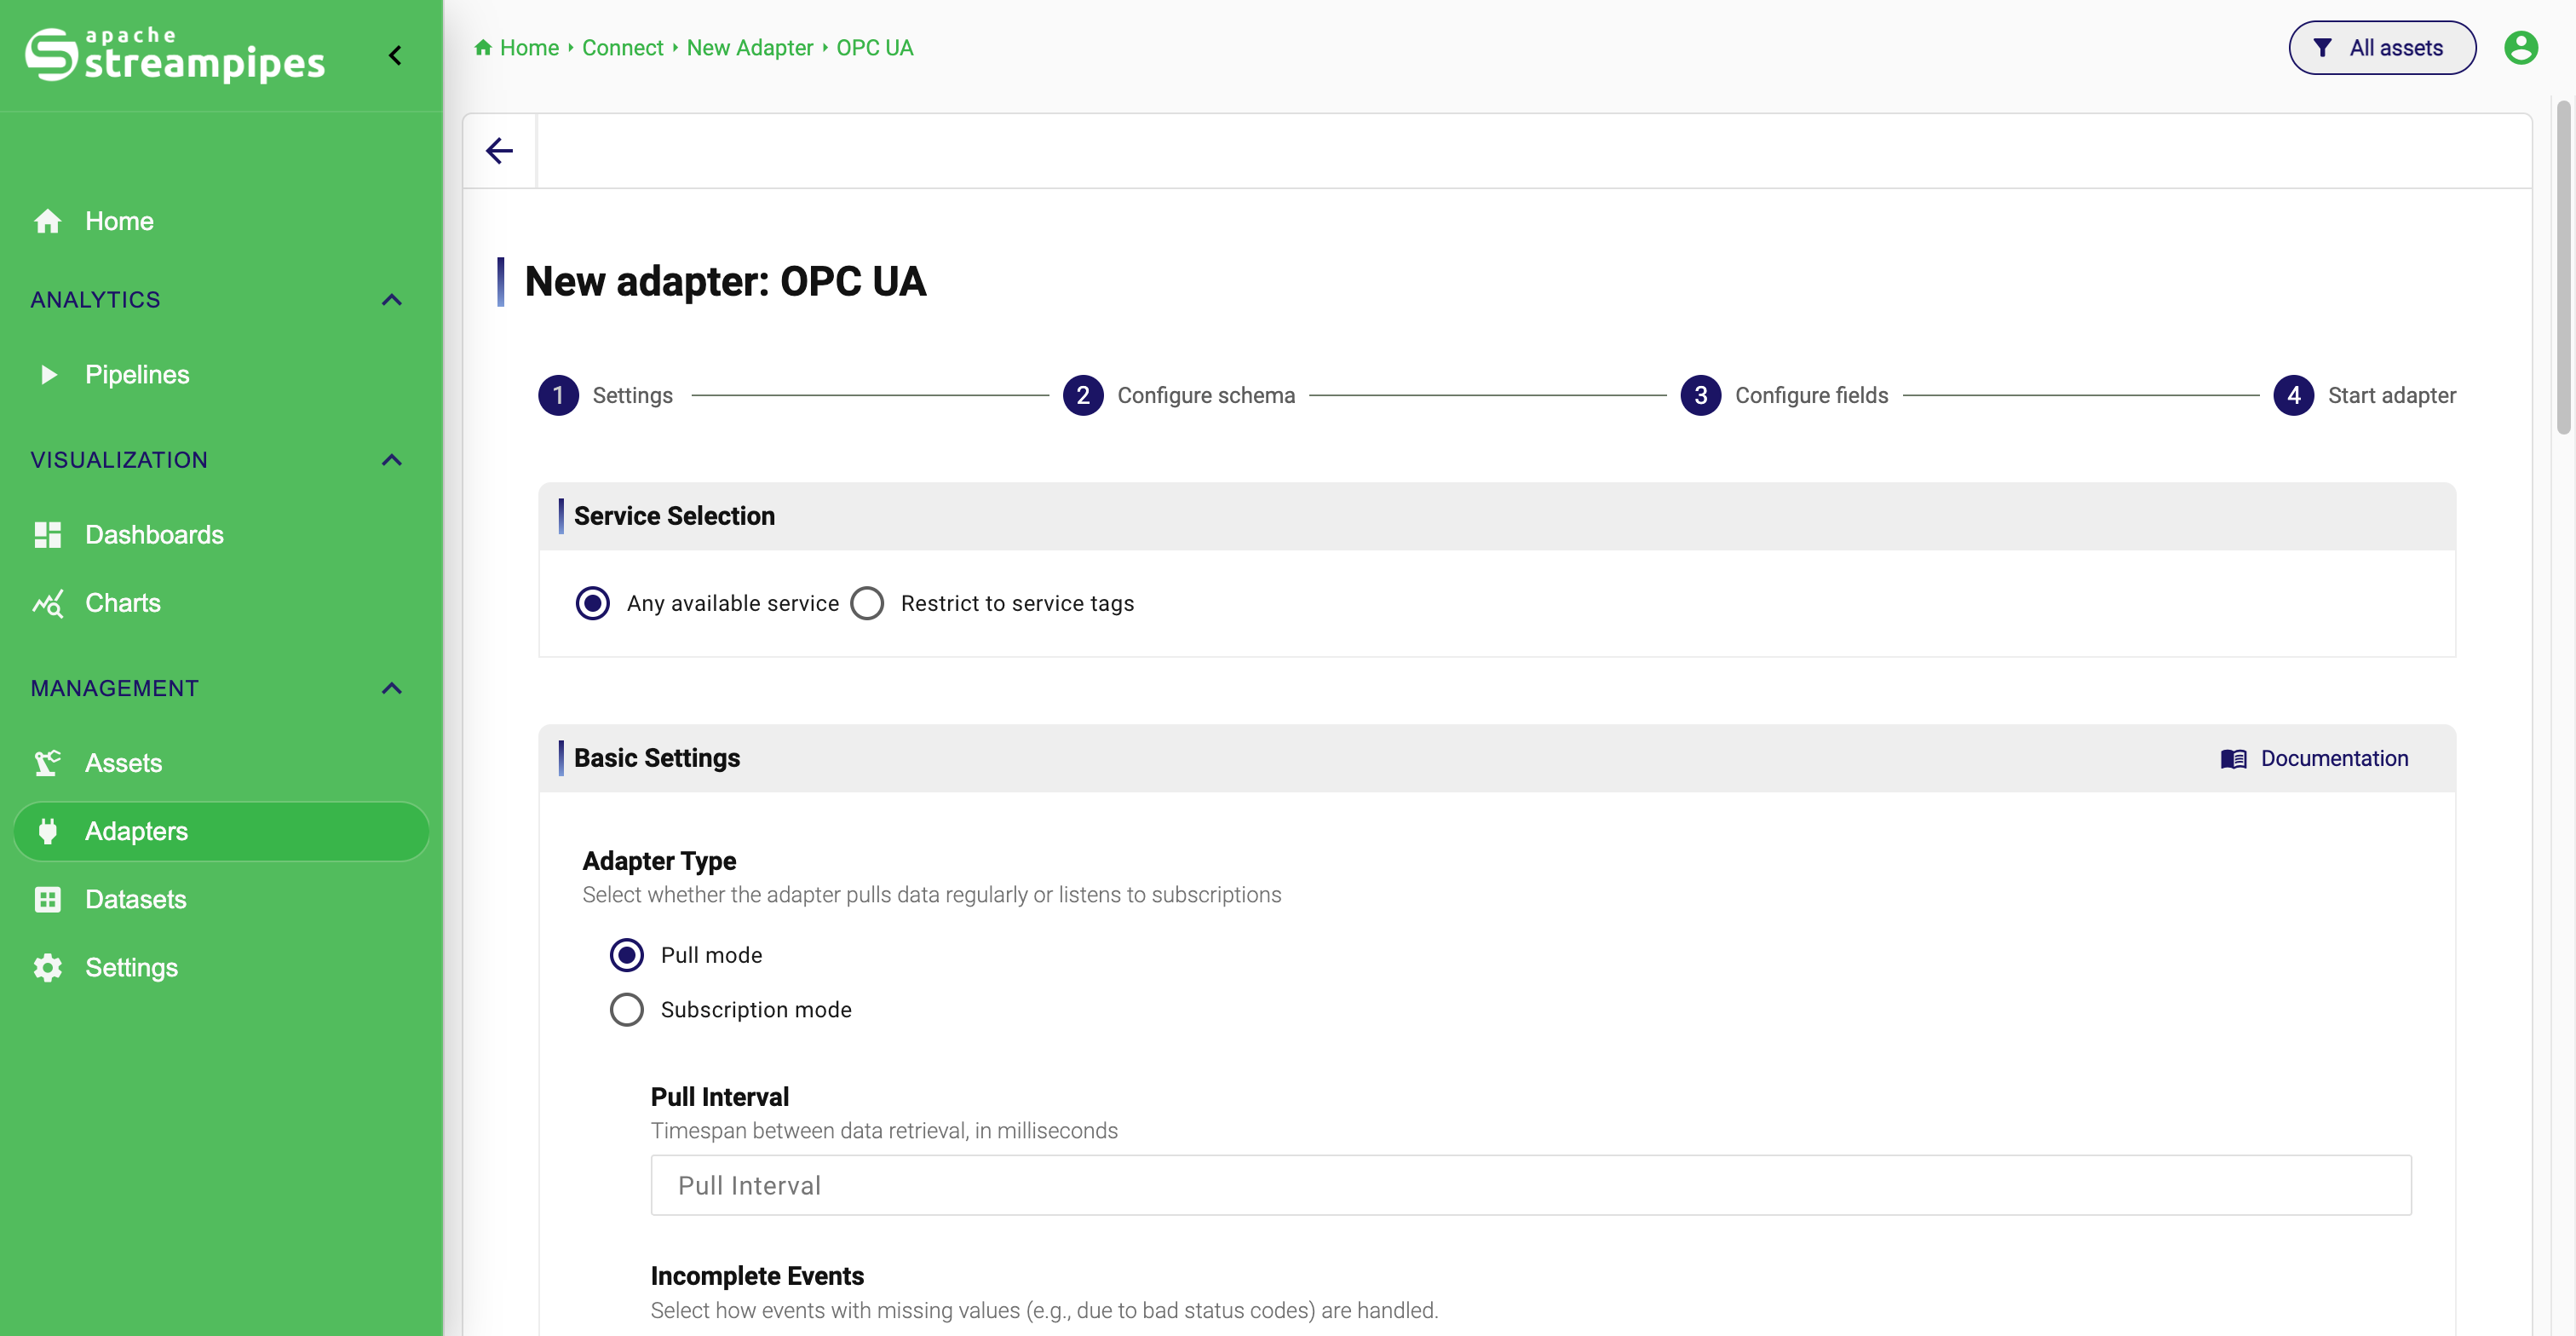
After selecting an adapter, StreamPipes opens a guided configuration flow. The first step is Settings.
Here, you provide the source-specific connection parameters required by the selected adapter. Depending on the adapter, this can include endpoint details, authentication information, polling behavior, file settings, or format-specific options.
For adapters that support multiple payload formats, StreamPipes also includes the format-related configuration as part of this stage. The exact fields differ by adapter, but the purpose stays the same: define how StreamPipes should connect to the source and read events from it.
OPC UA
Imagine a team receives machine events from an OPC UA Server. In this step, they would define where the server is located, the mode (subscrition or polling), security settings and the nodes to fetch.
Configure Source Settings
3. Inspect and shape the incoming event structure
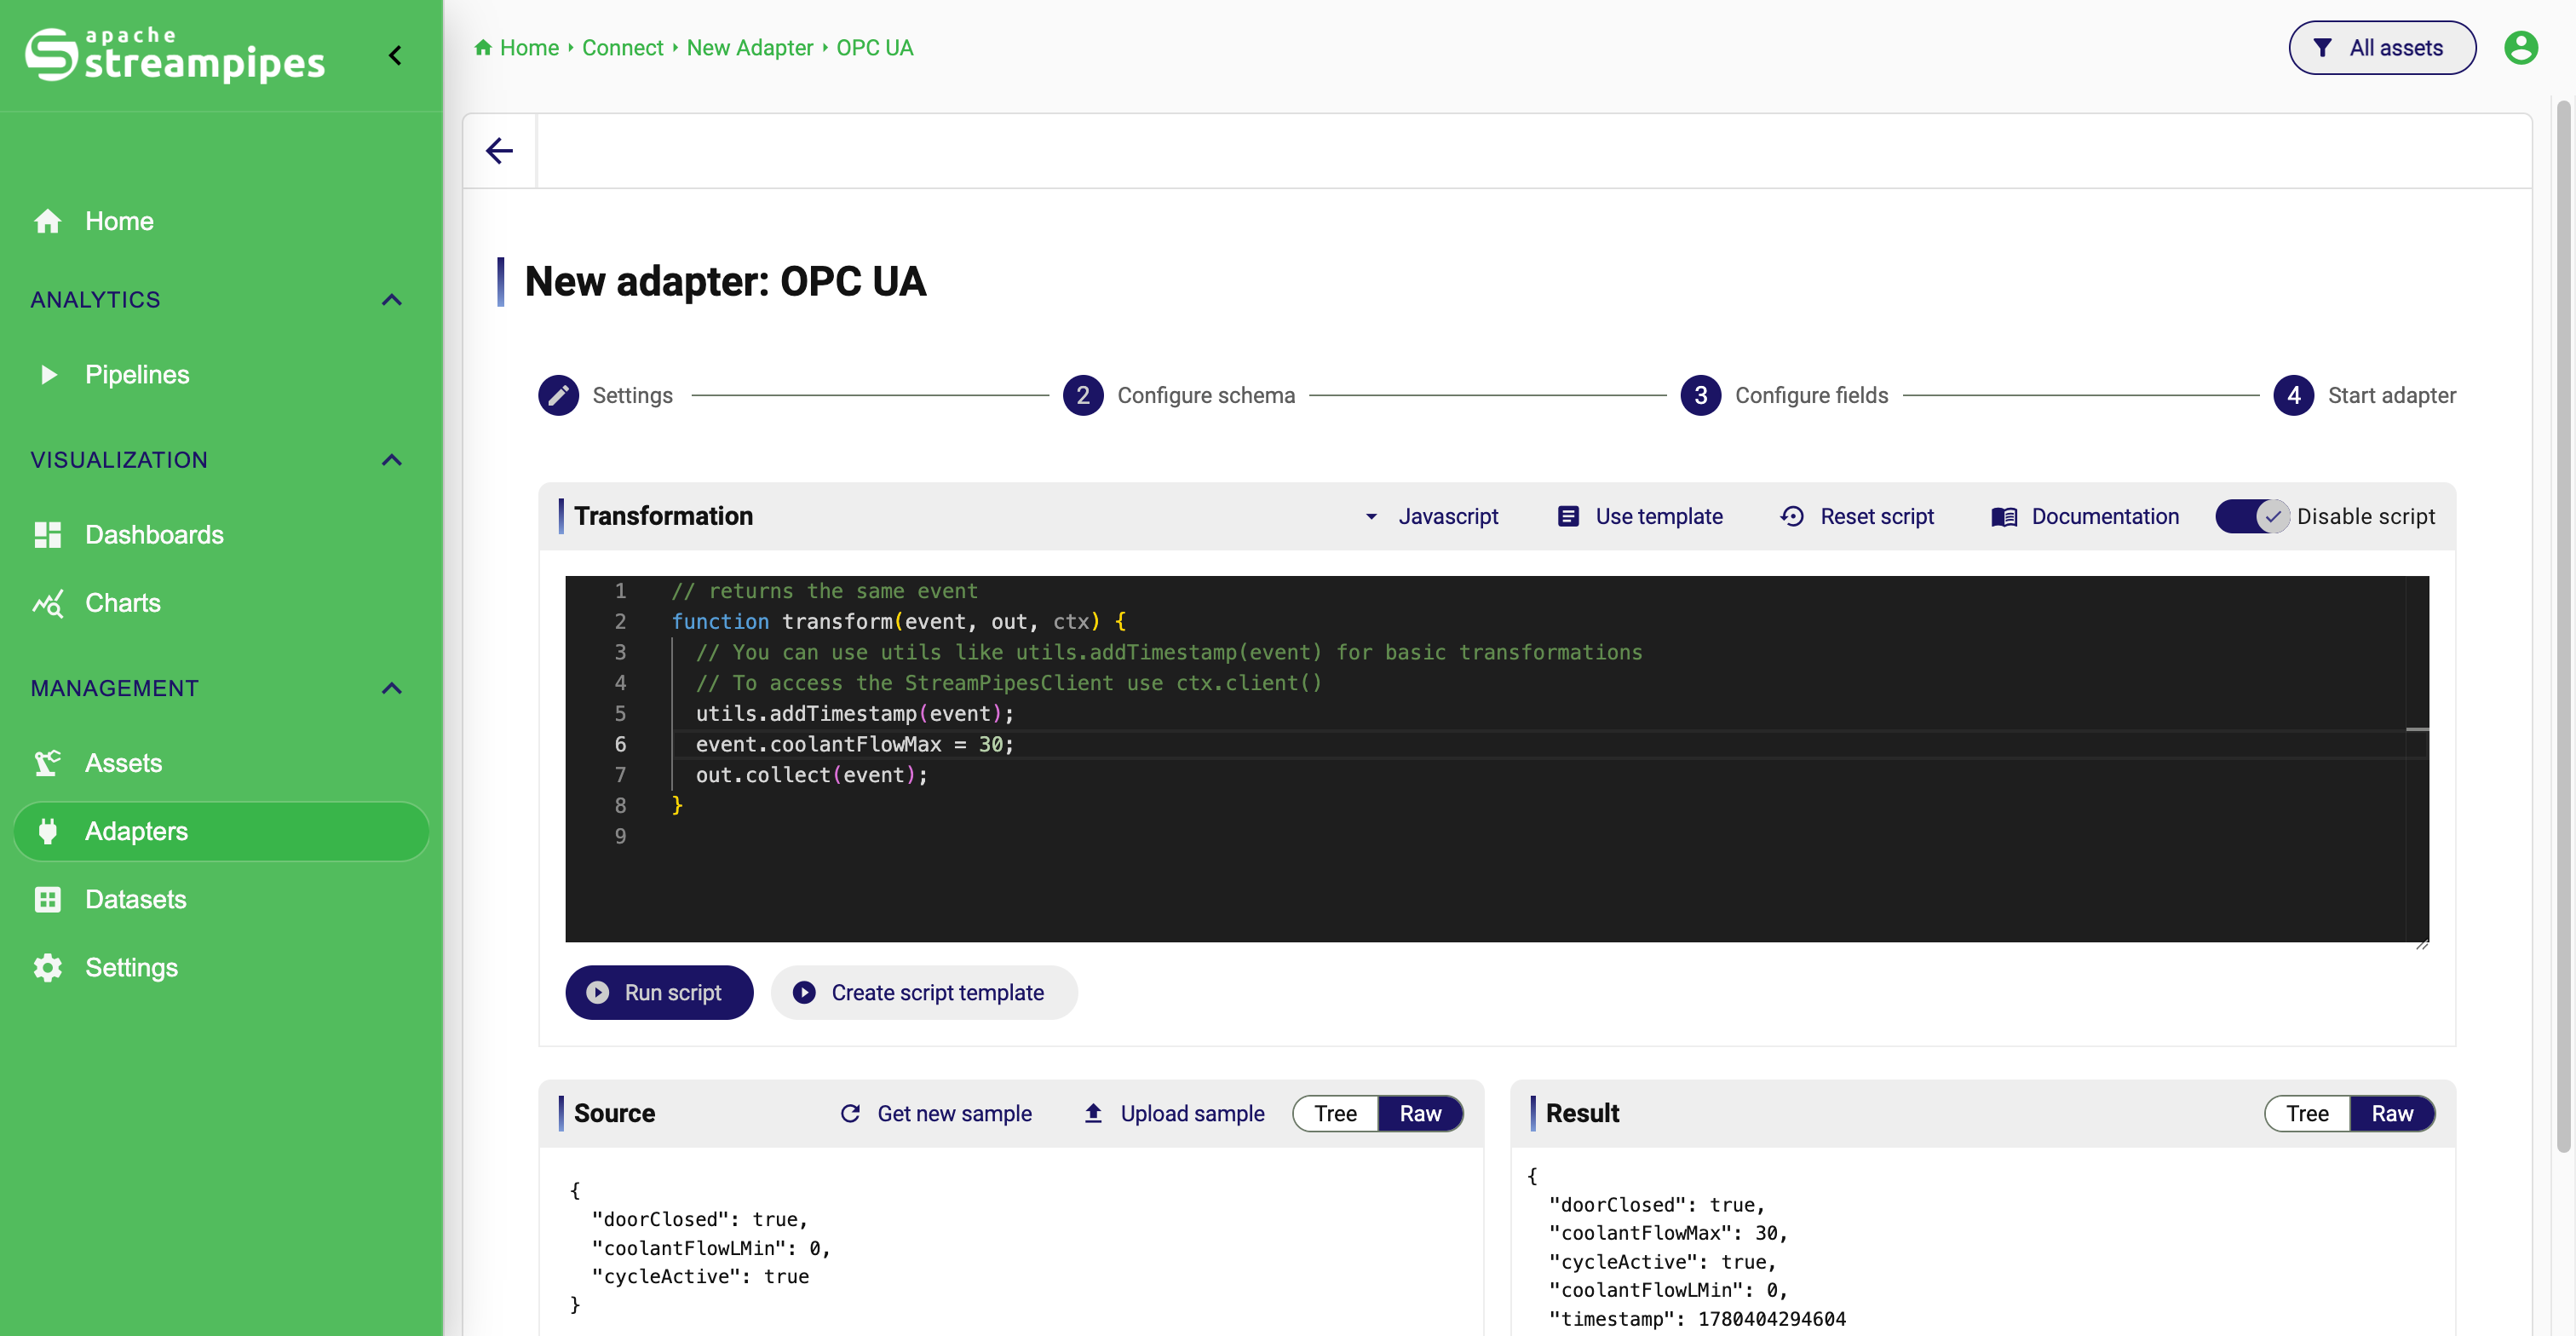
The second step is Configure schema. At this point, StreamPipes uses the provided adapter settings to work with sample events from the source.
This step supports several important tasks:
- loading or refreshing a sample event
- previewing the raw incoming payload
- uploading a sample event when needed
- running optional transformation scripts on the sample
- comparing input and transformed output before the adapter is created
This is where StreamPipes starts turning source-specific payloads into platform-ready event structures. Instead of blindly ingesting data, users can validate whether the input looks correct before continuing.
Script Transformation
If the source event does not provide a timestamp, users can add an ingestion timestamp to the event in the script editor.
Script transformation
As a convention, every event that is ingested into StreamPipes needs to provide a timestamp measured in UNIX milliseconds. The key doesn't matter, but you need one value of this type. If you don't have such a formatted timestamp, use the script editor to transform an existing time indicator or create a new timestamp using the utility functions.
See below for a details description which features are available in the script editor.
Using script-based transformations
The transformation editor is the place where users can modify incoming events before they are turned into the final StreamPipes event structure. This is useful when the source payload is close to what you need, but not yet ready for reuse.
Typical reasons to use the editor include:
- parsing timestamps from custom source fields
- renaming or dropping fields before they appear in the final schema
- reshaping payloads into a cleaner output structure
- deriving calculated values from raw source data
The editor can be enabled directly in the schema step. Once enabled, StreamPipes shows:
- a source preview with the incoming event
- a code editor for the transformation script
- a result preview with the transformed event
This setup is designed for iterative work: inspect a sample, edit the script, run it, and compare input and output until the structure looks correct.
Supported languages
The available script languages depend on the transformation engines installed in the StreamPipes environment. In the current StreamPipes source code, the transformation layer supports at least:
- JavaScript
- Groovy
If multiple languages are available in your installation, the editor lets you switch between them from the language menu. When you switch languages, StreamPipes loads the default template for that language.
JavaScript skeleton
For JavaScript, the default script looks like this:
function transform(event, out, ctx) {
  // You can use utils like utils.addTimestamp(event) for basic transformations
  // To access the StreamPipesClient use ctx.client()
  out.collect(event);
}
The parts of this skeleton are:
event: the current input event as key/value dataout: the output collector used to emit transformed eventsctx: a context object that provides access to the StreamPipes clientout.collect(event): emits the event that should become the transformation result
If you keep the script unchanged, the event is passed through as-is.
If you modify the event or construct a new object before calling out.collect(...), the output preview and final schema will reflect those changes.
Groovy syntax
If Groovy is available, the default script is more compact:
out.collect(input)
In Groovy, the current event is available as input.
The same basic idea applies: modify the input or construct a new output object, then emit it through out.collect(...).
What users typically change in the script
Most transformation scripts are short and focused. Typical patterns include:
- pass through the original event
function transform(event, out, ctx) {
  out.collect(event);
}
- emit a cleaned-up event with renamed fields
function transform(event, out, ctx) {
  out.collect({
    machineId: event.machine,
    temperature: event.sensor_value,
    timestamp: event.ts,
  });
}
- parse a timestamp before continuing
function transform(event, out, ctx) {
  utils.parseTimestamp(event, "input_timestamp", "timestamp");
  out.collect(event);
}
- derive new values
function transform(event, out, ctx) {
  out.collect({
    sensor: event.sensor,
    temperatureF: (event.temperatureC * 9 / 5) + 32,
  });
}
Built-in helpers and editor support
The transformation editor includes built-in documentation and helper functionality. From the current UI and source code, users can rely on:
- editor autocomplete for available event field names
utils.addTimestamp(...)to add a timestamp fieldutils.rename(...)to rename a fieldutils.remove(...)to remove a fieldutils.parseTimestamp(...)to convert source date fields into epoch timestampsctx.client()to access StreamPipes client APIs from inside the script
This means the script editor is not only a raw code field. It is a supported transformation environment for practical preprocessing tasks.
When to use scripts vs. field configuration
Use the transformation script when the payload itself must change before StreamPipes derives the final schema. Use field configuration in the next step when the payload shape is already correct and you mainly want to improve metadata.
As a rule of thumb:
- use scripts for structural changes, renaming, parsing, calculated values, and event cleanup
- use field configuration for labels, property scopes, timestamp marking, data types, units, and semantic enrichment
Transformation templates
The schema step also supports reusable transformation templates. These are useful when the same logic is applied to multiple adapters.
A typical workflow is:
- write and test a script against a sample event
- save it as a transformation template
- apply that template in other adapters that need the same preprocessing
Example: if several CSV exports from different production cells all contain the same custom timestamp field and naming scheme, a shared transformation template avoids rewriting the same script each time.
4. Refine fields and metadata
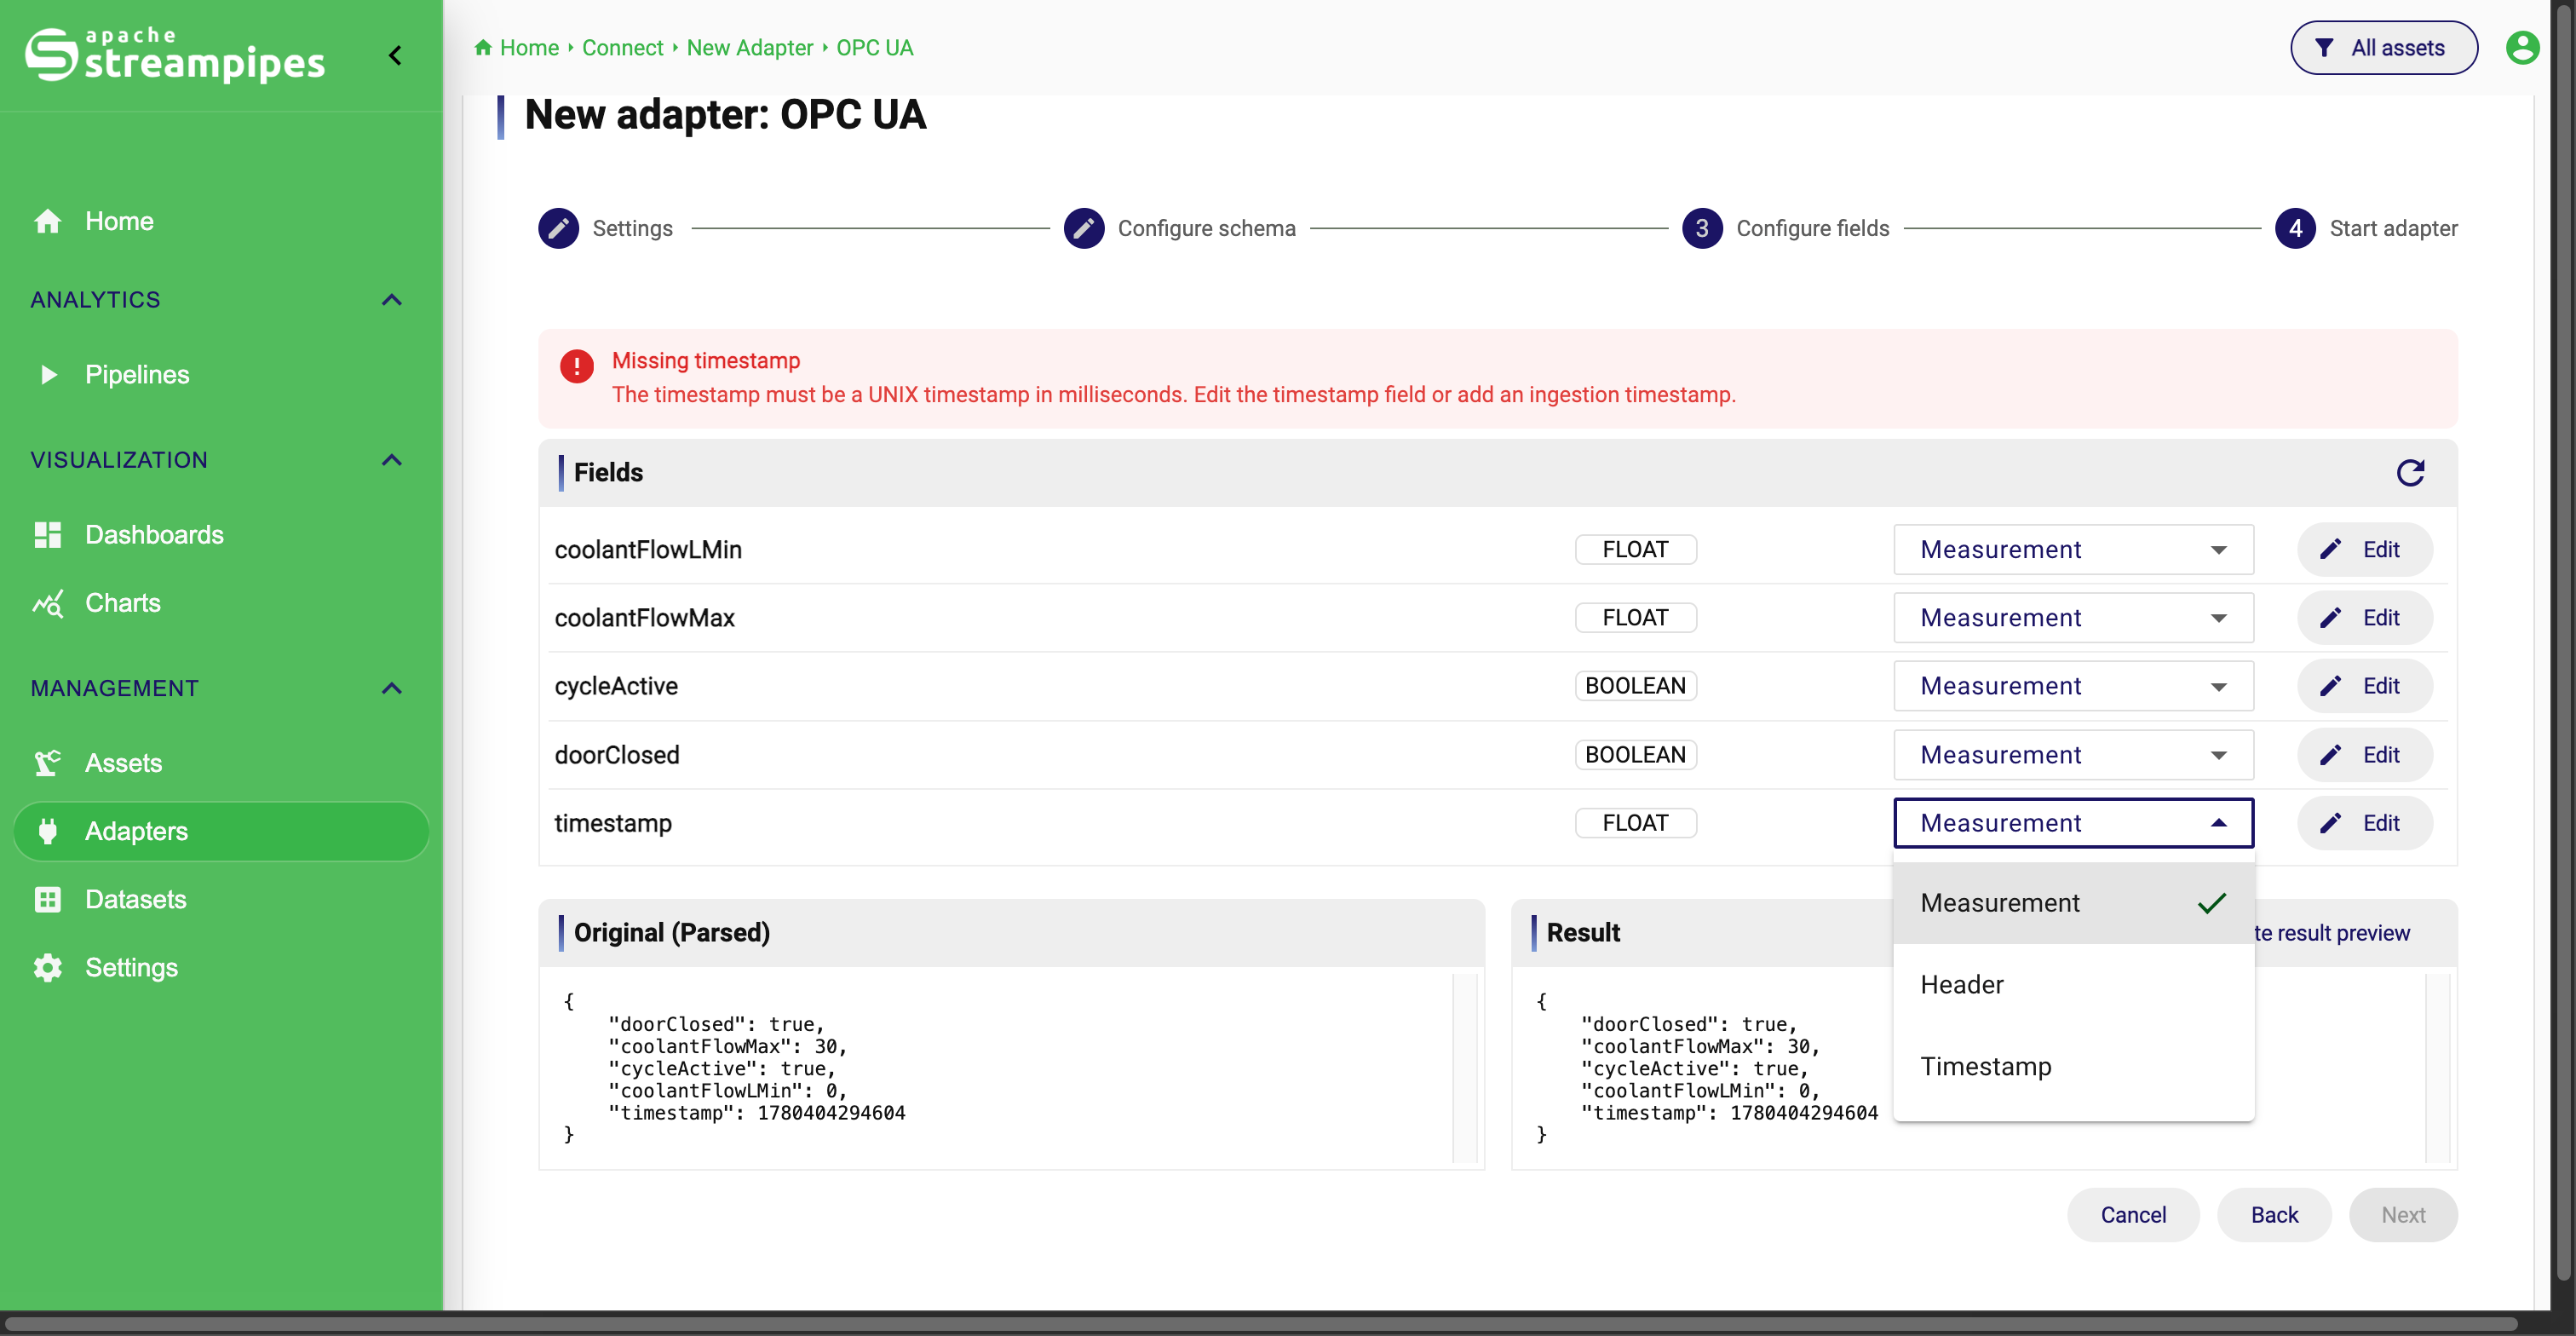
The third step is Configure fields. Here, StreamPipes exposes the resulting event schema and lets users enrich it field by field. At this point, the structural transformation work should already be done. This step is about making the resulting fields understandable and reusable across the platform.
Typical refinement tasks include:
- reviewing discovered event properties
- changing data types where needed
- marking a field as the timestamp
- assigning labels and descriptions
- defining property scopes such as measurement, dimension, or header
- enriching fields with semantic meaning and units
This step is critical because it determines how reusable the resulting data stream will be in the rest of the platform. A well-defined schema improves discoverability, validation, pipeline configuration, and downstream analytics.
Assigning a timestamp is especially important, since time-aware storage, charts, and stream processing depend on it.
Add Metadata and Runtime Options
Refine the Schema
Example: after a script has already normalized the payload, a stream might contain temperature, machineId, and timestamp.
In this step, a user can mark temperature as a measurement, classify machineId as a dimension, mark timestamp as the event time, and attach the correct unit so later users do not have to guess what the fields mean.
Measurement, dimension, and header
One of the most important decisions in this step is the property scope of a field. Property scopes help StreamPipes understand what role a field plays.
In practice, the most important scopes are:
- Measurement for actual observed or calculated values
- Dimension for identifiers and contextual attributes
- Header for technical or auxiliary metadata
Use Measurement when a field represents the value you want to analyze. Typical examples are:
- temperature
- pressure
- vibration
- energy consumption
- calculated KPIs such as average cycle time
Use Dimension when a field helps describe where the event belongs, not what was measured. Typical examples are:
- machine ID
- line name
- site
- product type
- batch number
Use Header for technical metadata that is relevant for event handling, but usually not the primary subject of analysis. Typical examples are:
- protocol metadata
- transport-specific identifiers
- helper timestamps that should stay available but are not the business event time
This distinction mainly improves usability. For example, configuration and exploration views can guide users better when StreamPipes knows which fields are likely measurements and which are identifiers.
To assign a property scope in the UI:
- open the Configure fields step
- locate the field you want to refine in the field list
- choose the appropriate property scope, such as
Measurement,Dimension, orHeader
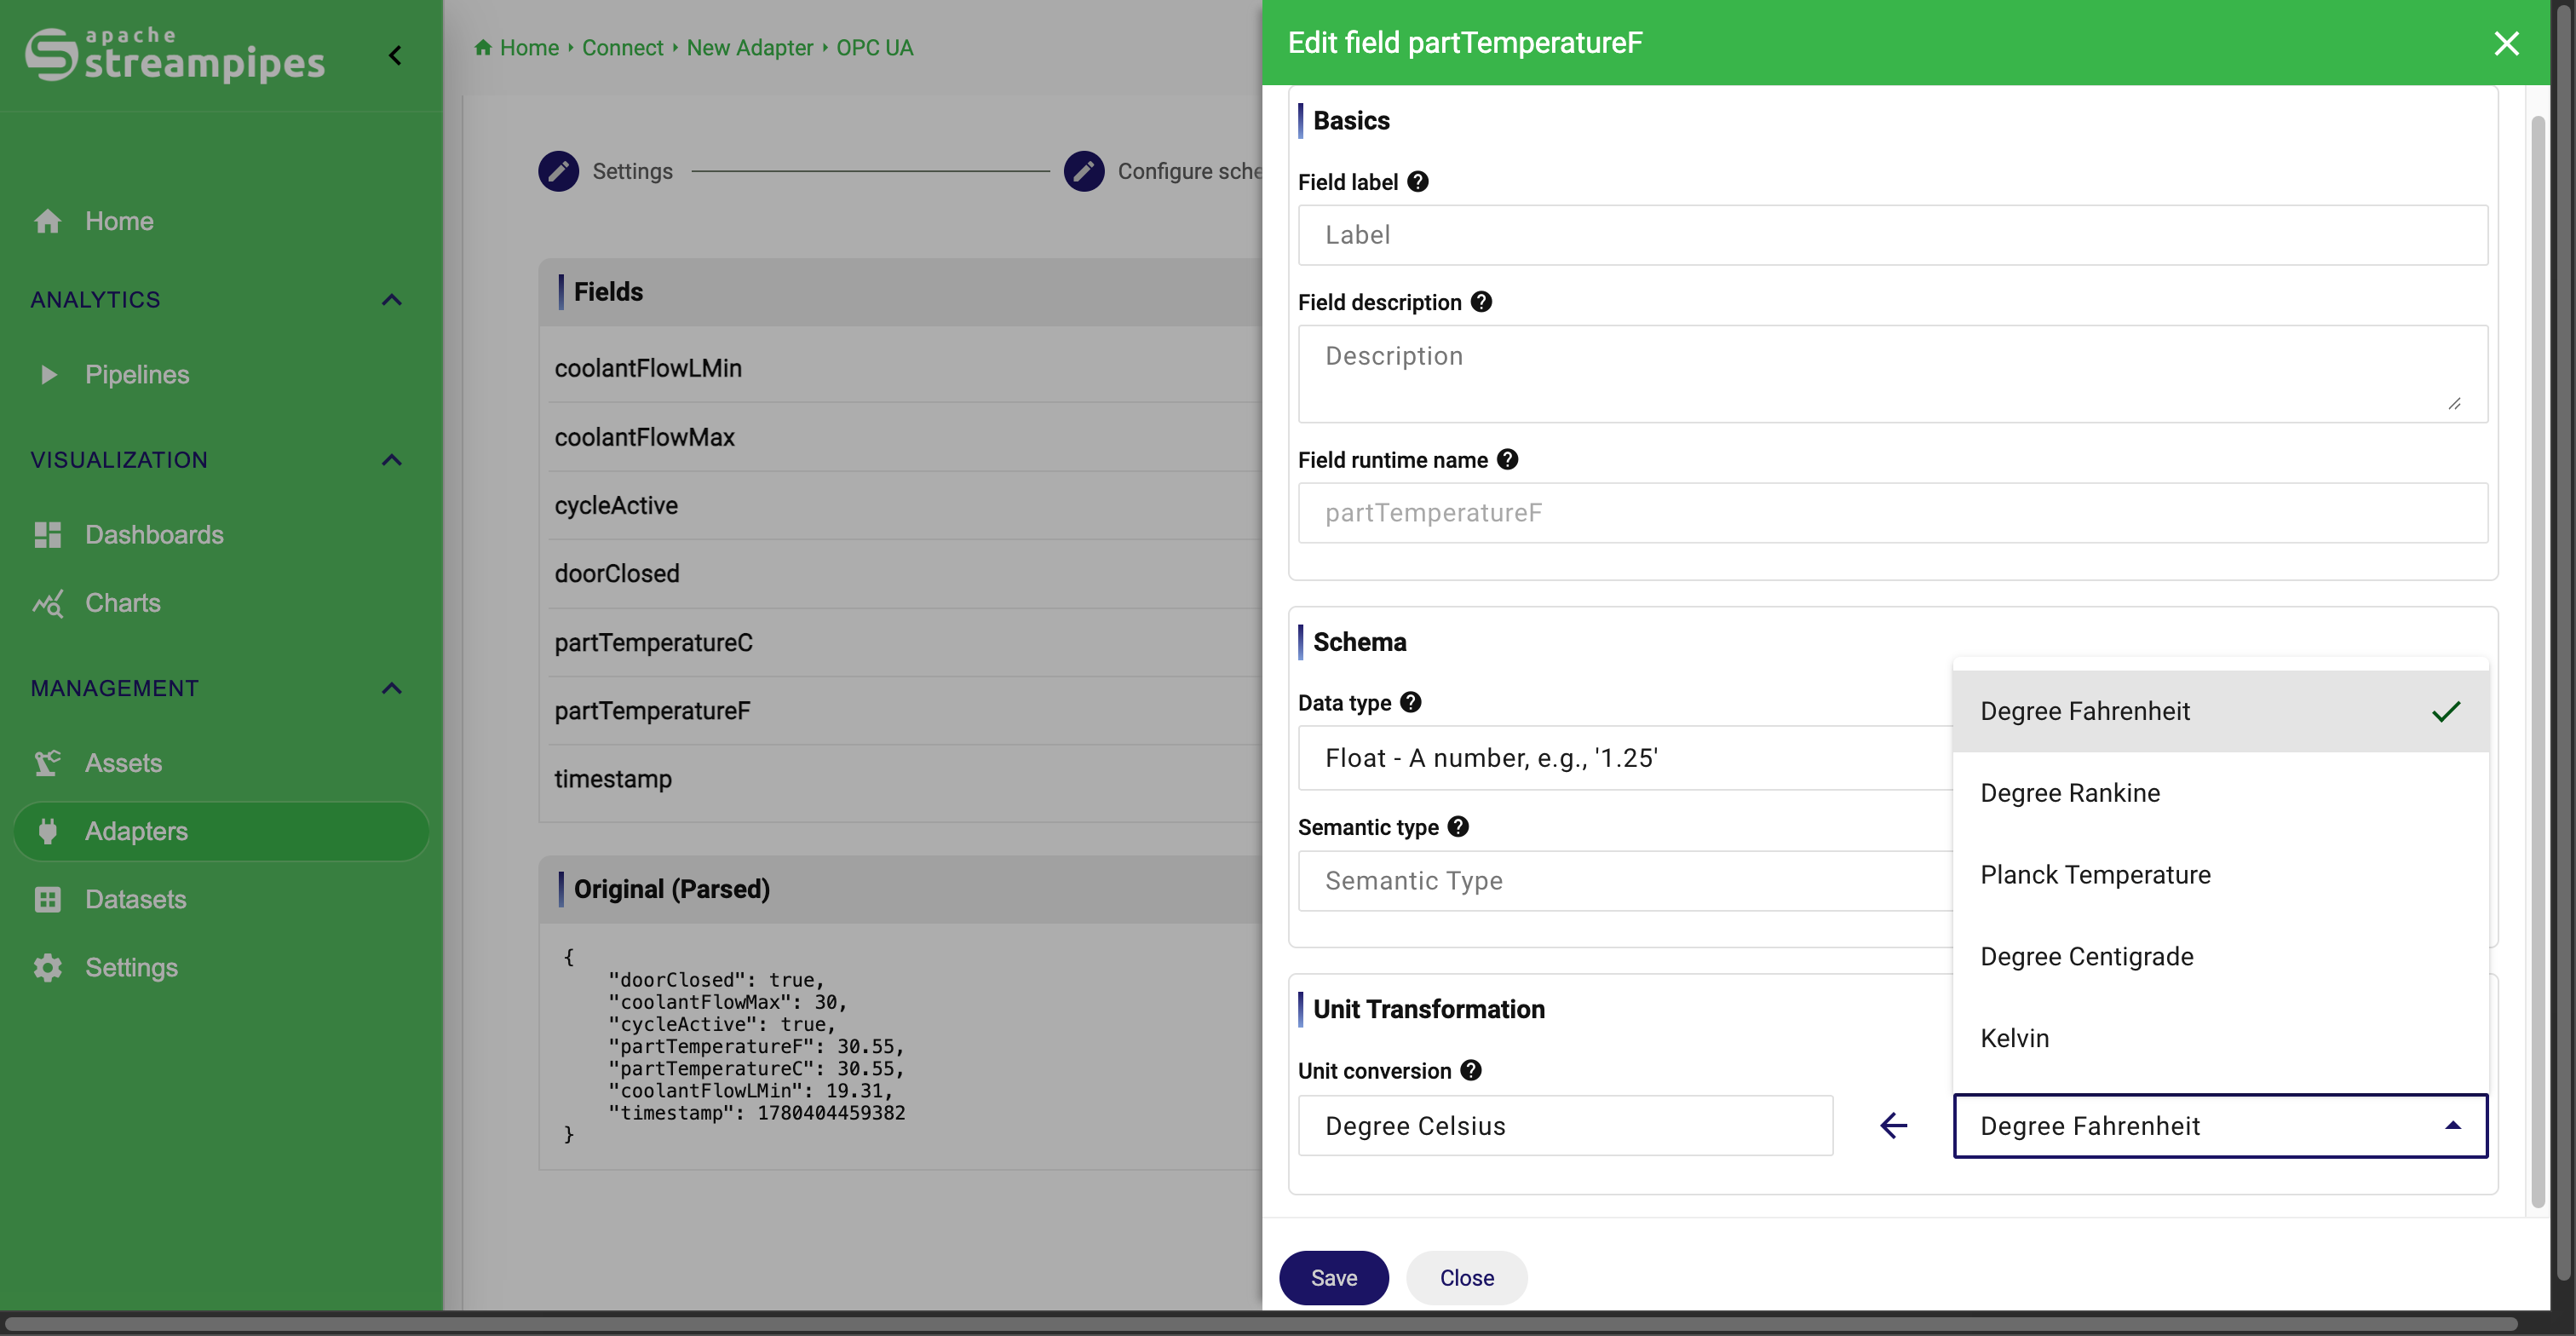
Units and unit conversion
The field editor also lets users assign a unit to measurement fields and, where needed, convert it into another target unit.
This is useful when:
- the source already contains a physical unit, but it is not yet documented in the schema
- different source systems report the same signal in different units
- downstream users should work with one normalized unit across plants or machine types
Example: one source reports temperature in degrees Celsius, while another team expects Fahrenheit for downstream reporting. Instead of forcing every downstream pipeline or dashboard to handle that conversion manually, StreamPipes can convert the field during onboarding so the resulting stream is already normalized.
The practical workflow is:
- identify the field as a measurement
- open the field editor dialog for that property
- assign the source unit
- optionally define the target unit for conversion
- save the field configuration and review the resulting preview/schema
This improves consistency across streams and reduces repeated conversion logic in later pipelines.
5. Create and start the adapter
The final step is Start adapter. This is where the configured ingestion setup becomes a managed platform resource.
At this stage, the connection details, transformation logic, and field definitions are already in place. The remaining task is to decide how the adapter should appear and behave once it becomes part of the running platform.
In this step, users can:
- define the adapter name and description
- choose whether the adapter should start immediately
- optionally link the adapter to one or more assets
- optionally persist incoming events in the internal data store
- enable event-rate reduction or duplicate filtering
- inspect the generated adapter definition as code
Once created, the adapter starts producing a data stream that becomes available throughout StreamPipes. From there, the stream can be used in pipelines, dashboards, charts, or other downstream workflows.
Example: a production engineer may start the adapter immediately for live monitoring, while a data team may also enable persistence so the same source is available later for historical analysis.
Adapter settings are the final step of the adapter creation.

Name and description
Every adapter should be given a clear name and, ideally, a short description. This matters because adapters become long-lived platform resources that appear in operational views and may later be edited, linked to assets, or reused by other teams.
Start adapter now
The Start adapter now option determines whether the adapter should begin consuming data immediately after creation.
Use this option when:
- the source is ready and reachable
- you want to validate live operation right away
- downstream users or pipelines should consume the stream immediately
Leave it disabled when:
- the adapter is being prepared ahead of a go-live
- source access is not yet available
- you want to finish organizational steps, such as asset linking or permissions, before starting ingestion
In practice, this option lets users decide whether the current task is “define the adapter” or “define and activate the adapter”.
Add to Asset
If asset management is used in the installation, the adapter can be linked directly to one or more assets in this step. This is useful when the source belongs to a known machine, line, site, or other operational object.
Use asset linking when you want to:
- make the source easier to discover from the asset view
- connect machine context and data source management
- help users navigate from operational structure to the related adapters and streams
Example: when onboarding a vibration source for a motor, link the adapter directly to that motor asset so users can find the source from the operational context instead of only from the adapter list.
Persist events
The Persist events option stores all incoming events of this source in the internal data store. This is one of the most important decisions in the start step because it affects whether the source is used only for live processing or also for historical analysis.
Use persistence when:
- the source should be available in charts later
- historical inspection or trend analysis is required
- teams want to reuse the stream beyond live processing only
When persistence is enabled, users also select the time field that should be used for storage. In most cases, this should be the business event timestamp that was defined earlier in the onboarding flow.
Example: persist a machine status or process-value stream when quality or maintenance teams need to inspect past behavior, not only live events.
Remove duplicates
The Remove duplicates option helps when a source sends the same event repeatedly within a short interval. In this case, StreamPipes can suppress duplicate events inside a configured time window.
Use this option when:
- a device republishes unchanged values frequently
- identical events would create unnecessary load in downstream systems
- duplicates would make charts or event-driven logic harder to interpret
The time window is configured in milliseconds. Within that interval, repeated identical events can be filtered before they are emitted further into the platform.
Example: if a device sends the same machine status message many times in a few seconds, duplicate filtering can reduce noise before the data reaches storage or alerting logic.
Reduce event rate
The Reduce event rate option helps when the source sends events much faster than downstream users actually need. Instead of forwarding every event, StreamPipes can limit the emitted rate based on a configured time window.
Use this option when:
- a source publishes high-frequency values but dashboards only need a coarser stream
- downstream systems should be protected from unnecessary volume
- the live stream is useful, but not every raw event must be preserved in real time
The time window is configured in milliseconds. This is especially useful for visualization-heavy scenarios where the source frequency is technically valid but operationally excessive.
Example: a sensor may publish updates several times per second, while a dashboard only needs one representative event every few seconds.
Show code
The Show code option exposes the generated adapter definition in a programmatic form. This is useful for teams that want to move from interactive setup to repeatable deployment.
Use this option when:
- you want to inspect how the current adapter is represented internally
- you want to reuse the configuration in another environment
- the adapter should later be created through the API or automation
In practice, this option bridges interactive onboarding and infrastructure-style reuse.
How to use this step in the UI
A common workflow in the final step is:
- enter a clear adapter name and description
- decide whether the adapter should start immediately
- optionally link it to the relevant asset
- decide whether the stream should also be persisted historically
- create or update the adapter
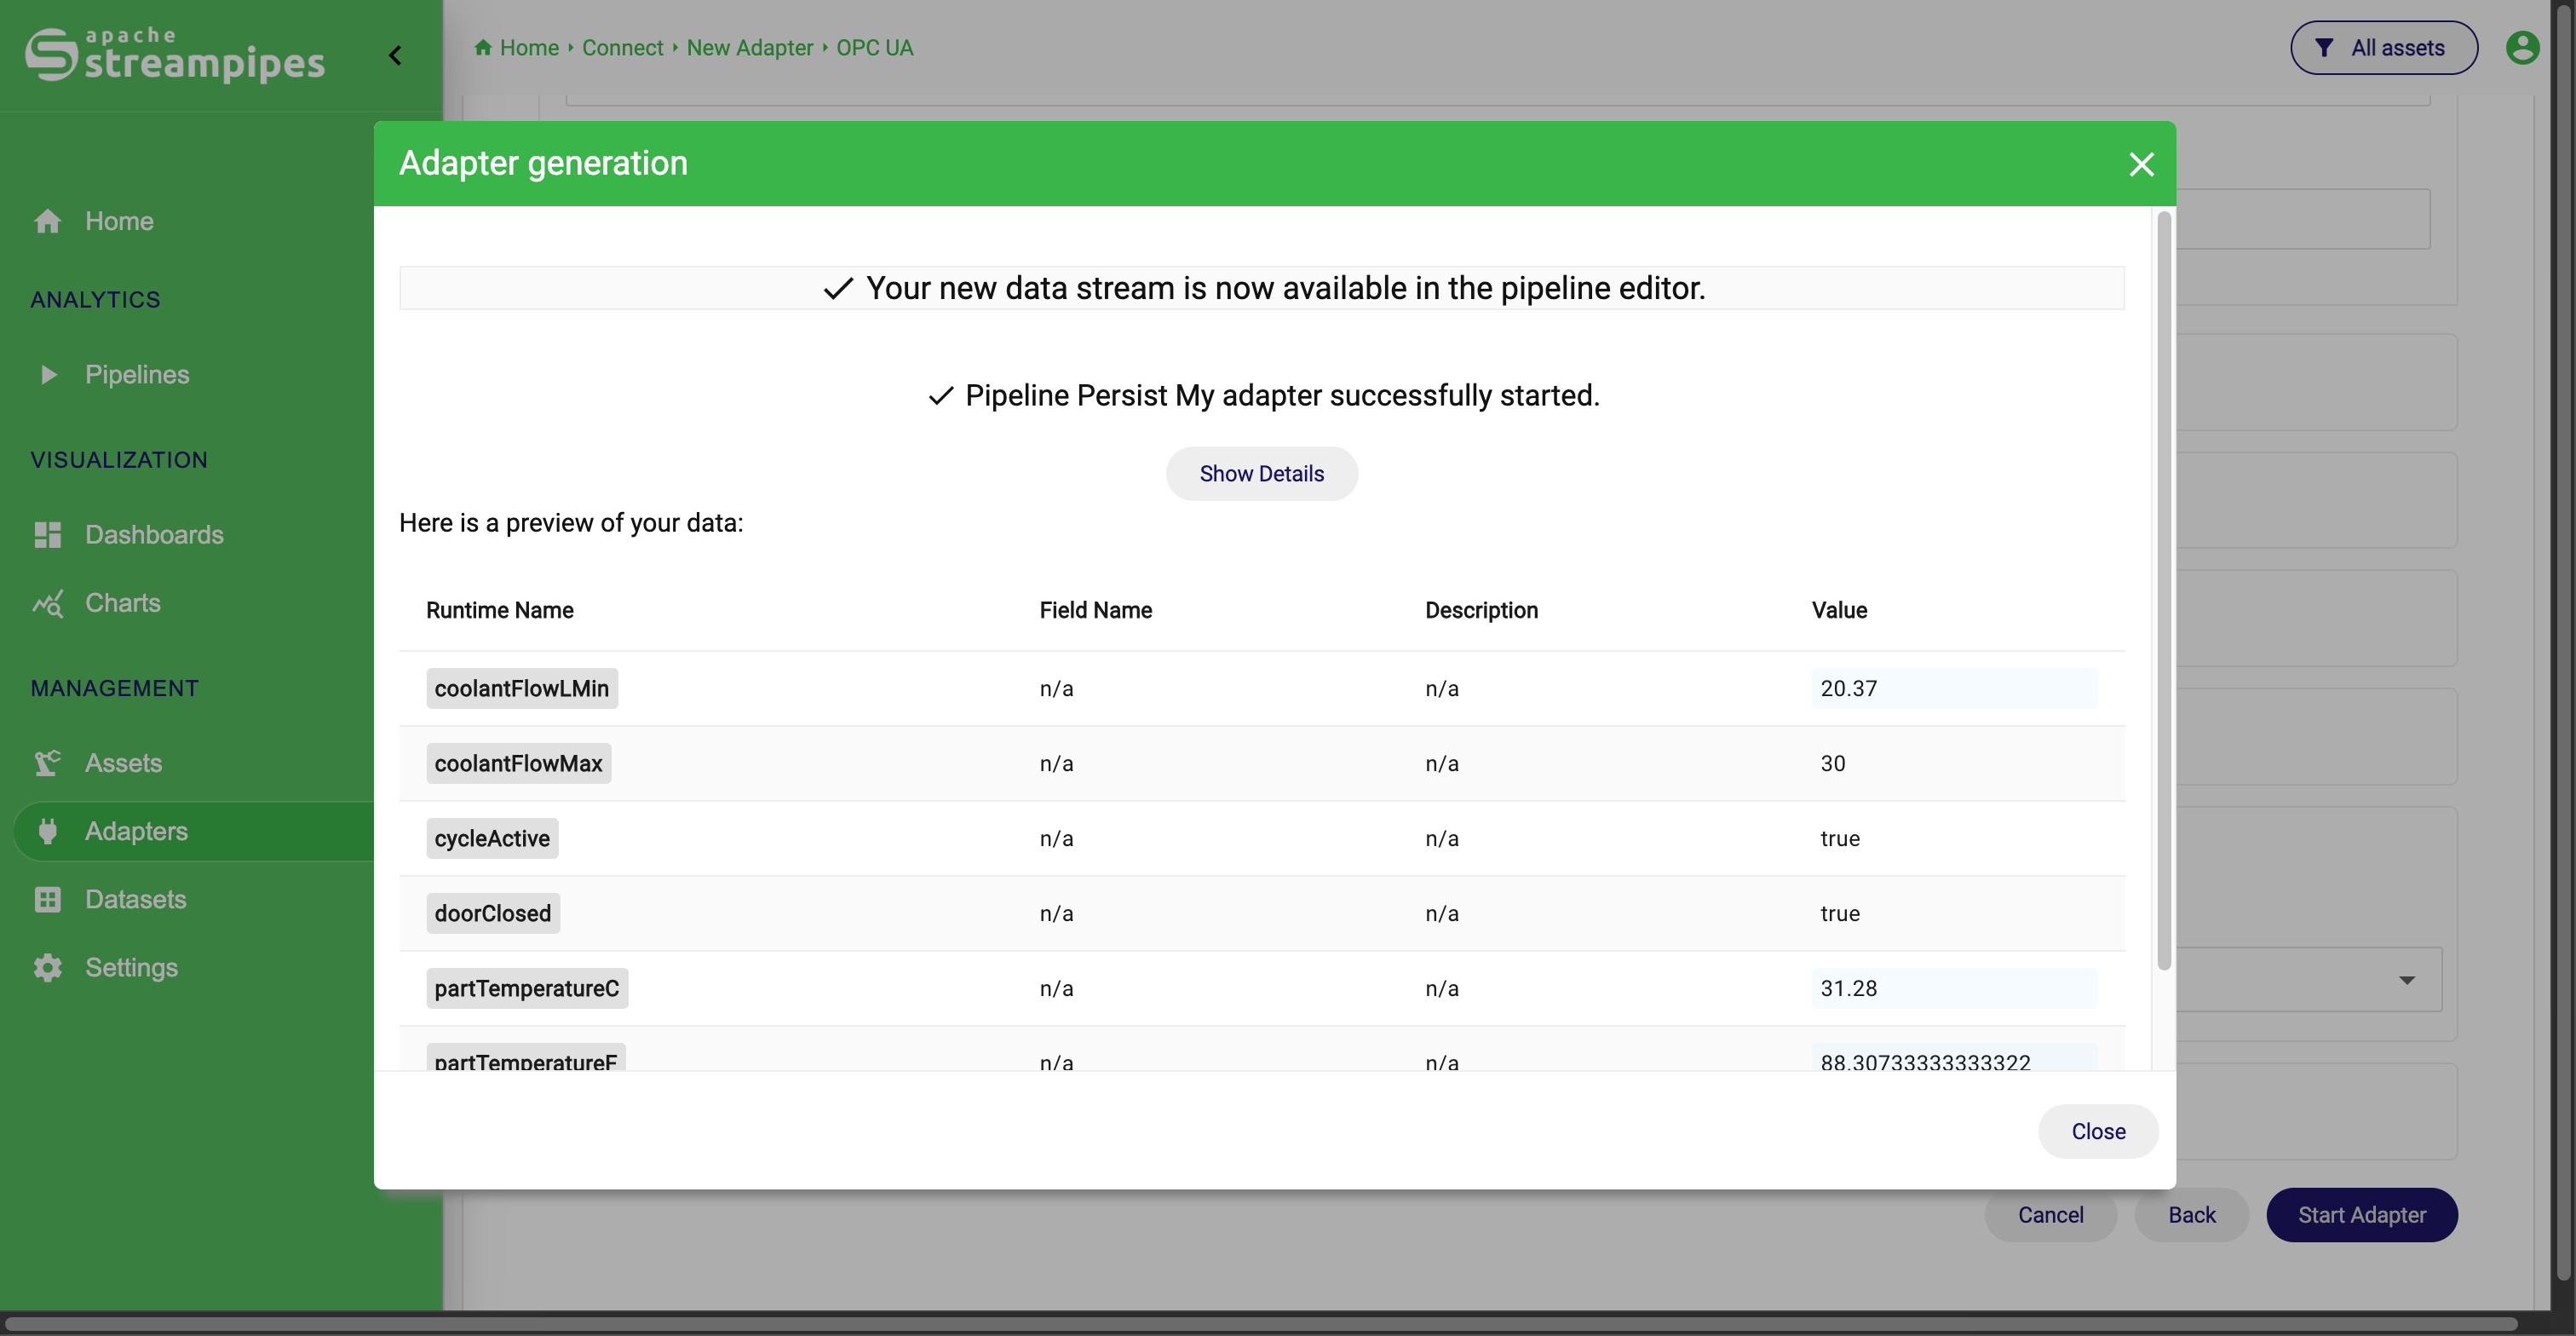
Afterwards, StreamPipes generates the adapter, creates a data stream that can be used within pipelines and external clients and starts the adapter if configured. You should see a live preview as follows:
Live preview
Transformation and schema features
One of the most important strengths of StreamPipes Connect is that source onboarding does not stop at connectivity. Before an adapter is created, users can actively shape the incoming data so that it fits the platform better.
The current feature set includes:
- script-based transformations for custom event reshaping
- template-based script reuse for recurring transformation logic
- schema refresh when the source configuration changes
- event preview before and after transformation
- timestamp selection and conversion
- unit and metadata refinement at field level
This makes Connect useful even when the incoming source format is technically valid but not yet ready for reuse across teams or use cases.
Two common examples are:
- a source provides timestamps in a custom text format, so a transformation script parses the original field and writes a normalized event time before the data enters StreamPipes
- a source provides temperatures in degrees Celsius, but a downstream team expects Fahrenheit, so the field configuration applies a unit conversion before the stream is used elsewhere
In addition, templates help in two different places:
- configuration templates in the settings step help you reuse adapter setup values
- transformation templates in the schema step help you reuse tested preprocessing scripts
This distinction is useful in practice:
- save a configuration template when many sources share the same connection shape
- save a transformation template when many sources share the same payload cleanup logic
Managing adapters after creation
Connect is also the operational workspace for adapters after they have been created. The adapter overview shows all configured adapters and provides lifecycle and monitoring features.
Users can:
- start and stop adapters
- inspect adapter details
- edit adapter configurations
- update schemas after configuration changes
- migrate dependent pipelines when an edited adapter affects downstream logic
- delete adapters
- manage permissions
- run bulk actions on multiple adapters
- review basic runtime indicators such as message counts and last message timestamps
This is important because data ingestion is rarely static. Machine interfaces change, schemas evolve, and downstream consumers need a controlled way to adapt. Connect therefore supports not only initial onboarding, but also ongoing maintenance.
Example: if a source system adds or renames fields, the adapter can be edited, the schema can be refreshed, and dependent pipelines can be migrated instead of being manually rebuilt from scratch.
Existing adapters
How Connect fits into the broader platform
Once an adapter is running, the resulting data stream becomes a reusable platform resource. That means connected data can immediately be used in other areas of StreamPipes:
- in Pipelines for filtering, enrichment, analytics, and routing
- in Charts and dashboards for visualization
- in Assets to tie machine data to operational context
- in the internal data store for historical access
This is why Connect should be understood as the ingestion layer of the overall StreamPipes data platform. Its role is not only to establish connectivity, but to create well-structured, governed, and reusable industrial data sources.
Example: a vibration stream connected in Connect can later be persisted for trend analysis, linked to a specific motor asset, visualized in a dashboard, and reused in a pipeline that detects threshold violations.
Adapters as code
Although adapters are usually created through the UI, StreamPipes also supports a compact programmatic representation for API-based deployment. This is useful when adapter creation should be automated or repeated across environments.
Typical use cases include:
- creating many similar adapters from managed configuration files
- promoting tested adapter definitions from development to production
- integrating adapter deployment into CI/CD or infrastructure automation
How the UI and code workflow fit together
The easiest way to produce a valid adapter definition is the UI itself. In the final Start adapter step, the Show code option exposes the generated adapter definition in a compact form.
This is the recommended workflow:
- configure and validate the adapter interactively in the UI
- use Show code to inspect the generated definition
- export or copy that definition
- reuse it through the API in another environment or deployment workflow
This works well because the UI already performs the difficult parts of onboarding: connection setup, schema inspection, field refinement, and transformation testing.
What the compact adapter definition contains
The compact representation describes the adapter in a way that is easier to manage programmatically than the full internal model. It typically contains:
- adapter identity such as
name,id, andappId - source-specific
configuration schemarefinements for fieldstransformlogic such as renaming or unit conversionenrichoptions such as adding timestampscreateOptionssuch as whether the adapter should start immediately or persist data
In practice, it captures the same decisions users make in the UI, but in a portable text format.
Example adapter definition
name: My OPC Adapter
id: testadapter
description: Test
appId: org.apache.streampipes.connect.iiot.adapters.opcua
configuration:
  - opc_host_or_url: OPC_URL
    opc_server_url: opc.tcp://localhost:62541/milo
  - adapter_type: PULL_MODE
    pulling_interval: 1000
  - access_mode: UNAUTHENTICATED
  - available_nodes:
      - "ns=2;s=Leakage Test Station/temperature"
      - "ns=2;s=Leakage Test Station/pressure"

schema:
  temperature:
    propertyScope: measurement
    label: Temp
    description: Temperature value
    semanticType: http://schema.org/temperature

enrich:
  timestamp: timestamp

transform:
  rename:
    pressure: pressure3

createOptions:
  persist: true
  start: true
This example shows the general structure, not a recommended protocol-specific setup for every case. The exact configuration keys depend on the selected adapter type.
API endpoint
To create a compact adapter over the API, send the definition to:
POST /streampipes-backend/api/v2/connect/compact-adapters
Content-Type: application/yml
Accept: application/yml
You can also provide the specification as JSON by using application/json.
Authentication can be provided with an API user and API key:
X-API-USER: your username
X-API-KEY: your api key
Practical advice
In most cases, do not write compact adapter definitions from scratch unless you already know the exact structure. A better approach is:
- create and verify the adapter in the UI first
- export or inspect the generated code
- adapt only the parts that need to vary, such as names, endpoints, or source-specific identifiers
This keeps the programmatic workflow grounded in a configuration that is already known to work.
Next steps
This page focuses on the general Connect workflow and feature set. It does not explain how to configure specific adapters or industrial protocols. View the How-to section and the extensions reference for an in-depth user guide on how to work with selected adapters.