Tutorial: Build Custom Adapters
In this tutorial, we will create a new data source consisting of a single data stream. By the end of the tutorial, you will be able to implement custom adapters that allow you to connect to data sources other than those officially supported by StreamPipes. To do this, we will split the tutorial into two parts. The first part focuses on creating the adapter and defining the event stream. At the end, we will have a working adapter that produces an event stream that can be used in StreamPipes. This adapter does not provide any way to configure its behavior, so in the second part of the tutorial to show how we can extend our existing adapter to be configurable via the UI.
This tutorial shows how to build your own type of adapter. It is intended for people who are interested in extending StreamPipes to meet their own needs. If you are here to explore StreamPipes and are interested in using an adapter, you may want to continue here.
Objective
We are going to create an adapter that will simulate a stream of data generated by a control station in a logistics center that is used to sort packages. This station consists of two sensors: a light barrier that detects when a package passes through, and a weight sensor.
This sensor produces a continuous stream of events containing the current time stamp, an indicator of whether a package is present or the conveyor is empty, and the weight of the package in kilograms. The events are published in JSON format as follows
{
  "timestamp": 1697720916959,
  "parcelPresent": true,
  "weight": 3.520
}
In the following section, we will show you how to develop an adapter that is capable of generating this stream so that it is available for further processing in StreamPipes.
Project Set Up
Instead of creating a new project from scratch, we recommend to use our Maven archetype to create a new project
skeleton (streampipes-archetype-extensions-jvm).
Enter the following command in a command line of your choice (please ensure
that Apache Maven isinstalled):
mvn archetype:generate \
-DarchetypeGroupId=org.apache.streampipes -DarchetypeArtifactId=streampipes-archetype-extensions-jvm \
-DarchetypeVersion=0.93.0 -DgroupId=org.apache.streampipes \
-DartifactId=streampipes-archetype-extensions-jvm -DclassNamePrefix=ParcelControlStation -DpackageName=parcelcontrol
This command will ask you for input twice, you can just skip both of them by hitting enter.
The first dialog sets the version to use for our streampipes-archetype-extensions-jvm module.
Feel free to change this if you like.
Define value for property 'version' 1.0-SNAPSHOT: :

 Y: :
The mvn archetype:generate command generates some required files, the required file structure, and some boilerplate
code.
The generated file structure should look like the following:
Note that you can customize the parameters of the mvn command to affect the file structure and file naming.
|streampipes-archetype-extensions  # name is determined by '-DartifactId'
|-- development
|   |-- env
|-- src
|   |-- main
|   |   |-- java.org.apache.streampipes  # name after .java. is determined by '-DgroupId'
|   |   |   |-- pe.parcelcontrol  # name after .pe. is determined by '-DpackageName'
|   |   |   |   |-- ParcelControlStationDataProcessor.java  # class name is determined by '-DclassNamePrefix'
|   |   |   |   |-- ParcelControlStationDataSink.java
|   |   |   |   |-- ParcelControlStationGenericAdapter.java
|   |   |   |   |-- ParcelControlStationSpecificAdapter.java
|   |   |   |-- Init.java
|   |   |-- resources
|   |   |   |-- org.apache.streampipes.pe.parcelcontrol.genericadapter
|   |   |   |   |-- documentation.md
|   |   |   |   |-- icon.png
|   |   |   |   |-- strings.en
|   |   |   |-- org.apache.streampipes.pe.parcelcontrol.processor
|   |   |   |   |-- documentation.md
|   |   |   |   |-- icon.png
|   |   |   |   |-- strings.en
|   |   |   |-- org.apache.streampipes.pe.parcelcontrol.sink
|   |   |   |   |-- documentation.md
|   |   |   |   |-- icon.png
|   |   |   |   |-- strings.en
|   |   |   |-- org.apache.streampipes.pe.parcelcontrol.specificadapter
|   |   |   |   |-- documentation.md
|   |   |   |   |-- icon.png
|   |   |   |   |-- strings.en
|   |-- test.java.org.apache.streampipes  # name after .java. is determined by '-DgroupId'
|   |   |-- InitTest.java
|-- Dockerfile
|-- pom.xml
In addition to the basic project skeleton, the sample project also includes a sample Dockerfile that you can use to
package your application into a Docker container.
Building a Basic Adapter
In the following, we will demonstrate how to use the boilerplate code generated by the Maven plugin ( see Project setup). Within this section, we will focus on creating an event stream that can be used within StreamPipes. The following section shows how to configure the created adapter with UI input.
Attentive readers may have noticed that two adapter classes have been generated.
We will focus on the ParcelControlStationSpecificAdapter first, the ParcelControlStationSimulatorGenericAdapter will
be used later for more advanced adapter features.
First, let us take a look at the ParcelControlStationSpecificAdapter.java file as generated by the Maven
archetype.
package org.apache.streampipes.pe.parcelcontrol;

import org.apache.streampipes.commons.exceptions.connect.AdapterException;
import org.apache.streampipes.extensions.api.connect.IAdapterConfiguration;
import org.apache.streampipes.extensions.api.connect.IEventCollector;
import org.apache.streampipes.extensions.api.connect.StreamPipesAdapter;
import org.apache.streampipes.extensions.api.connect.context.IAdapterGuessSchemaContext;
import org.apache.streampipes.extensions.api.connect.context.IAdapterRuntimeContext;
import org.apache.streampipes.extensions.api.extractor.IAdapterParameterExtractor;
import org.apache.streampipes.model.AdapterType;
import org.apache.streampipes.model.connect.guess.GuessSchema;
import org.apache.streampipes.sdk.builder.adapter.AdapterConfigurationBuilder;
import org.apache.streampipes.sdk.builder.adapter.GuessSchemaBuilder;
import org.apache.streampipes.sdk.helpers.Labels;
import org.apache.streampipes.sdk.helpers.Locales;

import java.util.HashMap;
import java.util.Map;

public class ParcelControlStationSpecificAdapter implements StreamPipesAdapter {

  private boolean running = false;

  @Override
  public IAdapterConfiguration declareConfig() {
    return AdapterConfigurationBuilder.create(
        "org.apache.streampipes.pe.parcelcontrol.specificadapter",
        ParcelControlStationSpecificAdapter::new
      )
      .withAssets(Assets.DOCUMENTATION, Assets.ICON)
      .withCategory(AdapterType.Manufacturing)
      .withLocales(Locales.EN)
      .buildConfiguration();
  }

  @Override
  public void onAdapterStarted(IAdapterParameterExtractor extractor,
                               IEventCollector collector,
                               IAdapterRuntimeContext adapterRuntimeContext) throws AdapterException {

    Runnable demo = () -> {
      while (running) {
        // make event
        Map<String, Object> event = new HashMap<>();
        // forward the event to the adapter pipeline
        collector.collect(event);
      }
    };
    running = true;
    new Thread(demo).start();
  }

  @Override
  public void onAdapterStopped(IAdapterParameterExtractor extractor,
                               IAdapterRuntimeContext adapterRuntimeContext) throws AdapterException {

    // do cleanup
    running = false;
  }

  @Override
  public GuessSchema onSchemaRequested(IAdapterParameterExtractor extractor,
                                       IAdapterGuessSchemaContext adapterGuessSchemaContext) throws AdapterException {

    // build the schema by adding properties to the schema builder and a preview if possible
    return GuessSchemaBuilder
      .create()
      .build();
    }
  }
The class extends StreamPipesAdapter, which is the interface that all adapters within StreamPipes must implement.
This interface requires us to implement four methods:
declareConfig(): This method is expected to return the configuration of the adapter. The configuration includes metadata about the adapter and its input parameters.onAdapterStarted(): This method is expected to contain the actual adapter logic. It is called when the adapter is started, and is responsible for sending incoming data to StreamPipes as an event.onAdapterStopped(): This method is called when the adapter is stopped and is responsible for gracefully exiting the adapter. gracefully and usually performs some cleanup tasks.onSchemaRequested(): This method is expected to return the schema of the event stream. This is ideally done dynamically based on some incoming data (guess) or provided statically if not otherwise possible.
Describing the Adapter via the Configuration
The standard code generated here is already sufficient for us. So let's have a quick look at the important aspects:
Line 4: Here we define a unique identifier for our adapter. This allows us to identify all instances of the same adapter. Including your own namespace is always a good choice to avoid conflicts.Line 7: Here we define what assets are available for this adapter. In this case, we provide a documentation file and an icon. Both assets are located in the `resource' directory (see file tree above).Line 8: This defines a rough categorization along predefined adapter types.Line 9: Here we define which locales are available for this adapter. Since we only provide one `strings.en' file so far (see file tree above), the current selection is sufficient. Theoretically you can support multiple languages, but this is not fully supported yet.
  @Override
  public IAdapterConfiguration declareConfig() {
    return AdapterConfigurationBuilder.create(
        "org.apache.streampipes.pe.parcelcontrol.specificadapter",
        ParcelControlStationSpecificAdapter::new
      )
      .withAssets(Assets.DOCUMENTATION, Assets.ICON)
      .withCategory(AdapterType.Manufacturing)
      .withLocales(Locales.EN)
      .buildConfiguration();
  }
Before we continue, let's quickly have a look at the strings.en file that defines our locales.
Here we can define a meaningful and human-readable adapter tile in the first line and a short description:
org.apache.streampipes.pe.parcelcontrol.specificadapter.title=Parcel Control Station (simple)
org.apache.streampipes.pe.parcelcontrol.specificadapter.description=This adapter simulates data coming from a parcel control station in a logistics center.
Now we have successfully configured our adapter and prepared all descriptive elements, we can focus on the actual logic.
Creating the Data Stream
The logic that creates events that are then populated via StreamPipes is defined in onAdapterStarted().
Within this method, connectors usually connect to the data source and extract data.
In our case, however, we simply want to create some sample data directly.
The two main parts that should always happen within this method are highlighted in the provided skeleton code:
Line 10: Creating an event is crucial for our adapters. This event is then filled with data by the adapter before it is distributed.Line 13: The event must finally be passed to thecollector, which then takes the data and distributes it within StreamPipes in the form of a data stream.
@Override
public void onAdapterStarted(IAdapterParameterExtractor extractor,
                             IEventCollector collector,
                             IAdapterRuntimeContext adapterRuntimeContext) throws AdapterException {

  Runnable demo = () -> {
    while (running) {

      // make event
      Map<String, Object> event = new HashMap<>();

      // forward the event to the adapter pipeline
      collector.collect(event);
    }
  };
  running = true;
  new Thread(demo).start();
}
So the only thing left to do is to create the actual events. In our scenario, we want to create two types of events: one describing an empty conveyor and one describing a detected and weighed package. To keep the implementation simple, we simply want to have a parcel event every five seconds. We can implement this as follows:
 Runnable parcelControl = () -> {
    while (running) {

      // get the current time in seconds
      long timestamp = System.currentTimeMillis();
      long timeInSeconds = (int) timestamp / 1000;

      // make event
      Map<String, Object> event = new HashMap<>();
      event.put("timestamp", timestamp);

      if (timeInSeconds % 5 == 0) {
        event.put("parcelPresent", true);
        event.put("weight", ThreadLocalRandom.current().nextDouble(0, 10));

      } else {
        event.put("parcelPresent", false);
        event.put("weight", 0);
      }

      // forward the event to the adapter pipeline
      collector.collect(event);

      try {
        Thread.sleep(1000);
      } catch (InterruptedException e) {
        throw new RuntimeException(e);
      }
    }
  };
  running = true;
  new Thread(parcelControl).start();
This is already enough to get a data stream into StreamPipes. As the next step we need to describe to event schema.
Defining the Event Schema
In StreamPipes, each data stream comes with an event schema that describes what information the event contains,
in what data formats, and some semantic type information.
This allows StreamPipes to provide easy and convenient stream handling with a lot of automatic conversions and
validations.
For example, whether a particular data processor is suitable for a given event stream.
This event schema is provided by onSchemaRequested():
@Override
public GuessSchema onSchemaRequested(IAdapterParameterExtractor extractor,
                                     IAdapterGuessSchemaContext adapterGuessSchemaContext) throws AdapterException {

  // build the schema by adding properties to the schema builder and a preview if possible
  return GuessSchemaBuilder
    .create()
    .build();
  }
Normally, the event schema is determined automatically and dynamically, since an adapter is usually quite generic (read more in the Advanced section). But in our case, we already know the event schema, and it never changes, so we can just define it:
@Override
public GuessSchema onSchemaRequested(IAdapterParameterExtractor extractor,
                                     IAdapterGuessSchemaContext adapterGuessSchemaContext) throws AdapterException {

  // build the schema by adding properties to the schema builder and a preview if possible
  return GuessSchemaBuilder.create()
          .property(timestampProperty("timestamp"))
          .sample("timestamp", System.currentTimeMillis())
          .property(PrimitivePropertyBuilder
                  .create(Datatypes.Boolean, "parcelPresent")
                  .label("Parcel Present")
                  .description("Indicates if a parcel is weighed.")
                  .domainProperty(SO.BOOLEAN)
                  .scope(PropertyScope.MEASUREMENT_PROPERTY)
                  .build())
          .sample("parcelPresent", true)
          .property(PrimitivePropertyBuilder
                  .create(Datatypes.Double, "weight")
                  .label("Parcel Weight")
                  .description("Parcel weight")
                  .domainProperty(SO.WEIGHT)
                  .scope(PropertyScope.MEASUREMENT_PROPERTY)
                  .build())
          .sample("weight", 3.520)
          .build();
An attribute of an Event is referred to as property in StreamPipes.
So in our case we have three properties.
Since StreamPipes creates a sample event in the UI when configuring the adapter (
see here),
providing a meaningful sample value for every property allows StreamPipes to demonstrate its full potential.
Since every event schema is required to have a timestamp property, we provide a convenience definition (see line 3).
For all other properties the recommend way of definition is using the PrimitivePropertyBuilder (see line 13-20) and
consists of the following steps:
Line 14: every property must have a data type specified and a property nameLine 15: In addition to the property name we can define a label that is designed for the end user and shown in the UI.Line 16: Assigns a human-readable description to the event property. The description is used in the StreamPipes UI for better explaining users the meaning of the property.Line 17: Specifies the semantics of the property (e.g., whether a double value stands for weight or temperature value).Line 18: Assigns a property scope to the event property. This determines how the property is handled internally.
StreamPipes does not require you to provide all of this information about a property.
Anything beyond line 14 (up to line 20) is optional, but the more you provide, the better StreamPipes can show it's
full potential and feature richness.
This makes our adapter almost complete, there is only one little step left.
Defining the Adapter Termination
As a final step, we need to define what should happen if the adapter is stopped. In general, the adapter should not fire any events after that. Normally, this step includes things like closing connections and clearing resources. In our case this is quite simple, we just need to stop our thread:
@Override
public void onAdapterStopped(IAdapterParameterExtractor extractor,
                             IAdapterRuntimeContext adapterRuntimeContext) throws AdapterException {

  // do cleanup
  running = false;
}
Now it's time to start our adapter and observe it in action!
Register and Run the Adapter
Before we actually use our adapter, let's take a quick look at the Init class. This class is responsible for
registering our adapter service with the core to make the adapter available in StreamPipes.
This is done within provideServiceDefinition(). Since we don't have the generic adapter ready yet,
we'll comment out its registration (line 7). Now we can run the Init class to register the adapter with your running
StreamPipes instance. If you don't have a running instance at your hand,
you can take a look at our Installation Guide.
@Override
public SpServiceDefinition provideServiceDefinition() {
  return SpServiceDefinitionBuilder.create("org.apache.streampipes",
          "human-readable service name",
          "human-readable service description", 8090)
      .registerRuntimeProvider(new StandaloneStreamPipesRuntimeProvider())
      //.registerAdapter(new ParcelControlStationGenericAdapter())
      .registerAdapter(new ParcelControlStationSpecificAdapter())
      .registerMessagingFormats(
          new JsonDataFormatFactory(),
          new CborDataFormatFactory(),
          new SmileDataFormatFactory(),
          new FstDataFormatFactory())
      .registerMessagingProtocols(
          new SpKafkaProtocolFactory(),
          new SpJmsProtocolFactory(),
          new SpMqttProtocolFactory(),
          new SpNatsProtocolFactory(),
          new SpPulsarProtocolFactory())
      .build();
}
When executing the main() method of the Init class, make sure that all environment variables are set from
the development/env file are set.
If they are not set, the adapter may not be able to register with StreamPipes.
Once you see the following log message in the console, the adapter is ready, and you can switch to the UI of your StreamPipes instance.
s.s.e.c.ConnectWorkerRegistrationService : Successfully connected to master. Worker is now running.
Please go to the connect module and click on New Adapter,
you should now be able to see your adapter Parcel Control Station (simple):
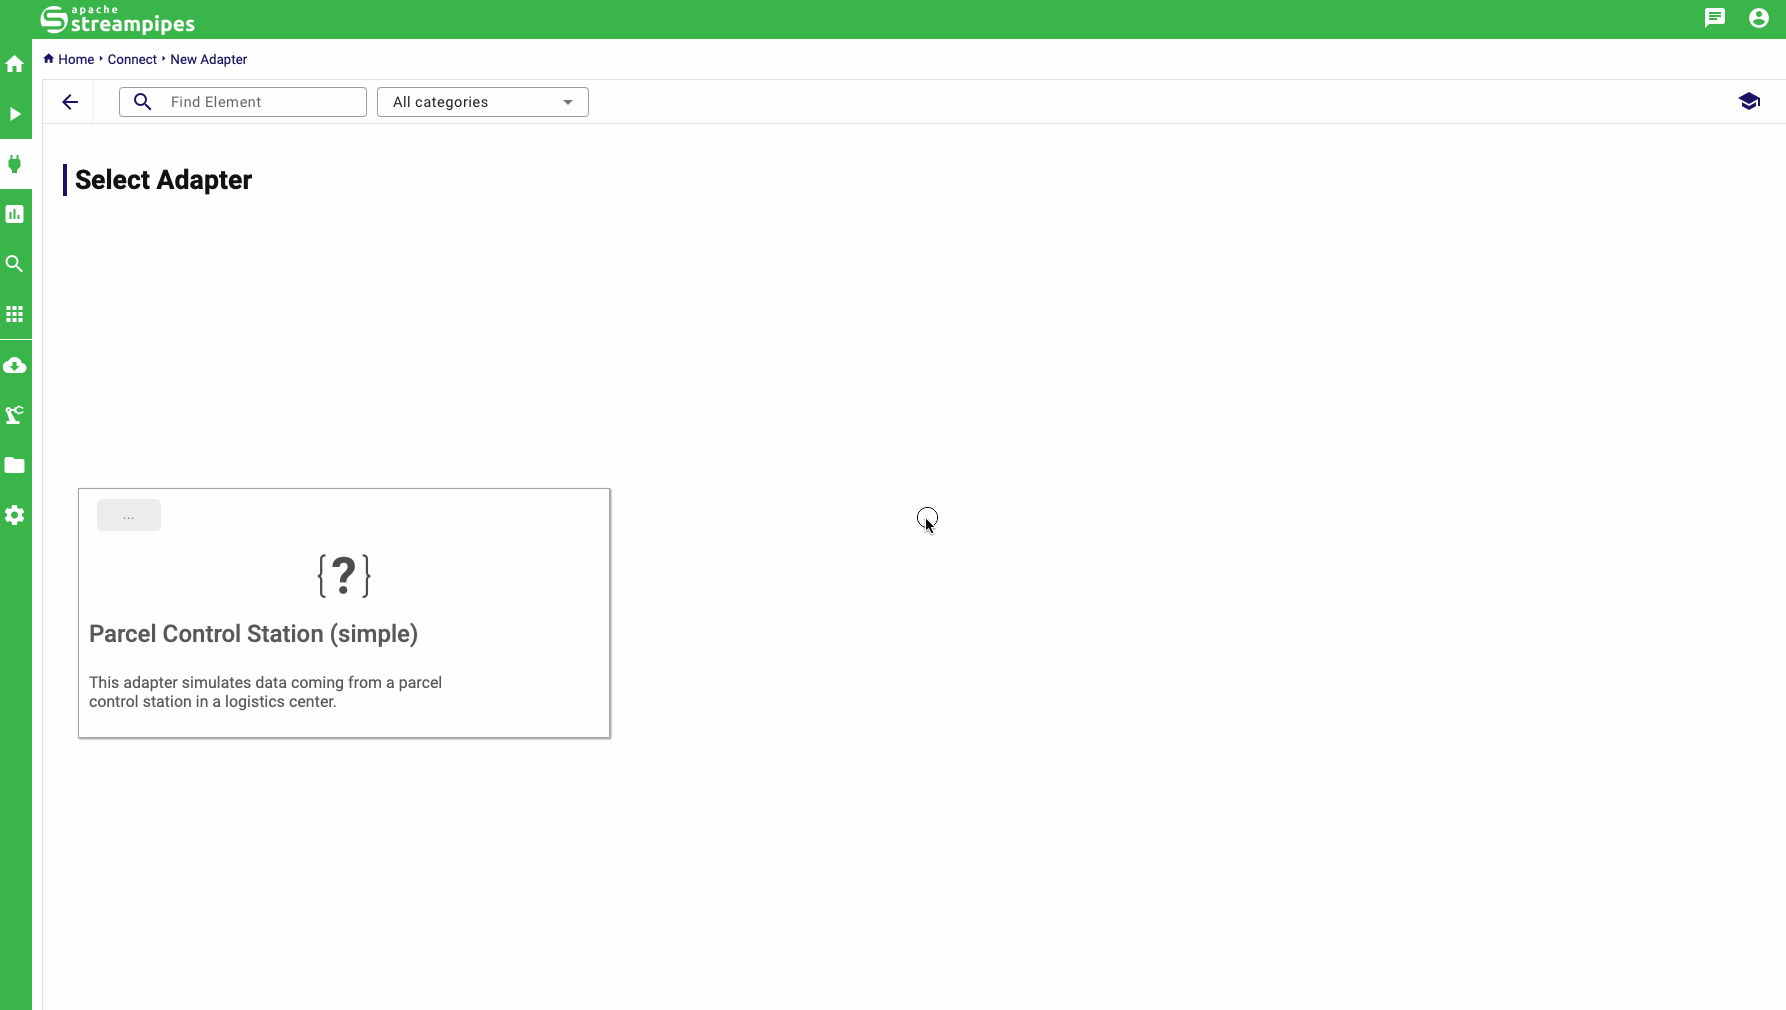
The adapter runs successfully in StreamPipes, you can now play around with the data stream that the adapter, or continue with the next section to learn how to make an adapter configurable through the UI.
Building a more Advanced Adapter by Processing UI Input
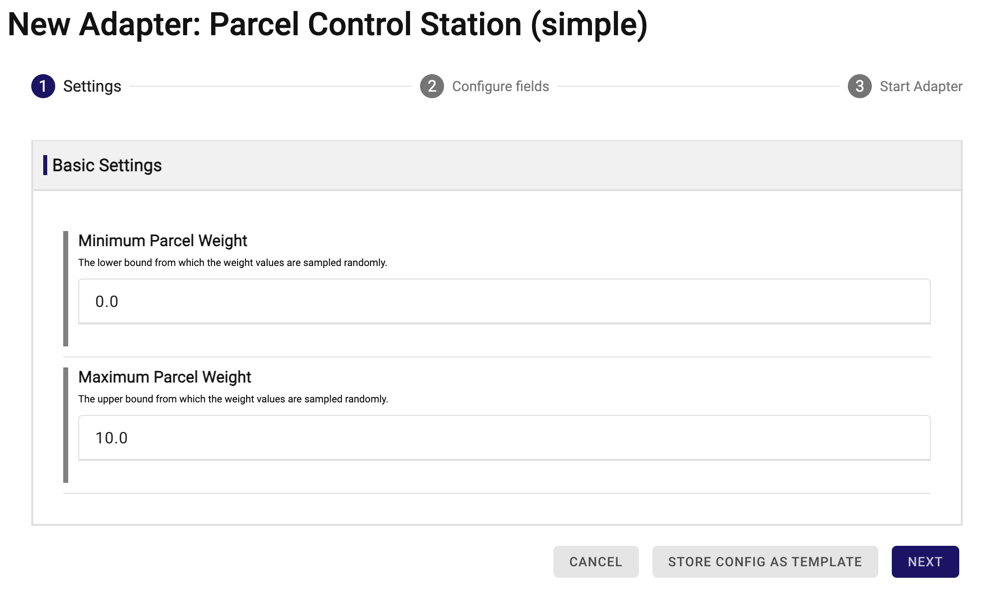
In this section, we will extend our previous build apter by adding the ability to configure the minimum and maximum
package
in the UI from which the weight value is retrieved.
The beauty of building adapters for StreamPipes is that you don't have to worry about the UI.
StreamPipes provides a set of pre-built input elements for adapters that you can simply add to your adapter
configuration.
So the first thing we need to customize is declareConfig():
@Override
public IAdapterConfiguration declareConfig() {
  return AdapterConfigurationBuilder.create(
                  "org.apache.streampipes.pe.parcelcontrol.specificadapter",
                  ParcelControlStationSpecificAdapter::new
          )
          .withAssets(Assets.DOCUMENTATION, Assets.ICON)
          .withCategory(AdapterType.Manufacturing)
          .withLocales(Locales.EN)
          .requiredFloatParameter(Labels.withId("min-weight"), 0.0f)
          .requiredFloatParameter(Labels.withId("max-weight"), 10.f)
          .buildConfiguration();
}
In line 9-10 we have introduced two input parameters that expect float values as input. They have a default value
of 0 or 10 resp. The defined identifier (min-weight and max-weight) can be used two provide a caption and
a description via the strings.en file:
min-weight.title=Minimum Parcel Weight
min-weight.description=The lower bound from which the weight values are sampled randomly.

max-weight.title=Maximum Parcel Weight
max-weight.description=The upper bound from which the weight values are sampled randomly.
As a last step, we now need to modify the calculation of the parcel weight, so that the provided parameters are actually
applied.
This is done in onAdapterStarted().
@Override
public void onAdapterStarted(IAdapterParameterExtractor extractor,
                             IEventCollector collector,
                             IAdapterRuntimeContext adapterRuntimeContext) throws AdapterException {

  var ex = extractor.getStaticPropertyExtractor();

  float minWeight = ex.singleValueParameter("min-weight", Float.class);
  float maxWeight = ex.singleValueParameter("max-weight", Float.class);

  Runnable parcelControl = () -> {
    while (running) {

      // get the current time in seconds
      long timestamp = System.currentTimeMillis();
      long timeInSeconds = (int) timestamp / 1000;

      // make event
      Map<String, Object> event = new HashMap<>();
      event.put("timestamp", timestamp);

      if (timeInSeconds % 5 == 0) {
        event.put("parcelPresent", true);
        event.put("weight", ThreadLocalRandom.current().nextDouble(minWeight, maxWeight));

      } else {
        event.put("parcelPresent", false);
        event.put("weight", 0);
      }

      // forward the event to the adapter pipeline
      collector.collect(event);

      try {
        Thread.sleep(1000);
      } catch (InterruptedException e) {
        throw new RuntimeException(e);
      }
    }
  };
  running = true;
  new Thread(parcelControl).start();
}
- line
6-9: We use anStaticPropertyExtractorto retrieve both user inputs - line
24: We calculate the parcel weight by passing the configured values vor the minimum and maximum value.
You can now run the main() method of the Init class to register the adapter at StreamPipes.
The UI dialog to create a new instance of our parcel control station adapter looks now the following:
Please make sure that you uninstall the parcel adapter in Install Pipeline Elements before
you restart the execution of the Init class, if you have already done so.
Otherwise, the changes made in this section will have no effect.
Read More
Congratulations! You've just created your first StreamPipes adapter 🎉
There are many more things to explore and data sources can be defined in much more detail. If this is of interest to you, the advanced section will satisfy your needs.
If anything within this tutorial did not work for you or you had problems following it, please feel free to provide some feedback by opening an issue on GitHub.